2.1 Setting Up Access to a Computer Running Oracle Connect for IMS, VSAM, and Adabas Gateways
To be able to access VSAM data, you must have a working connection to Oracle Connect for IMS, VSAM, and Adabas Gateways, which is installed on the IBM z/OS computer where your VSAM files are located. You establish this connection by using Oracle Studio for IMS, VSAM, and Adabas Gateways.
Whenever needed, you can also use Oracle Studio for IMS, VSAM, and Adabas Gateways to configure Oracle Connect for IMS, VSAM, and Adabas Gateways.
Note:
The following task assumes that you have permission to access the IBM z/OS platform and that the Oracle Connect for IMS, VSAM, and Adabas Gateways daemon is running on this computer. Check with the system administrator to ensure these requirements are fulfilled.
Perform the following steps to set up access to a computer that runs Oracle Connect for IMS, VSAM, and Adabas Gateways.
-
From the Start menu, select Programs, point to Oracle, and select Studio. Oracle Studio for IMS, VSAM, and Adabas Gateways opens.
-
In the Design perspective's Configuration view, right-click the Machines folder and select Add Machines.
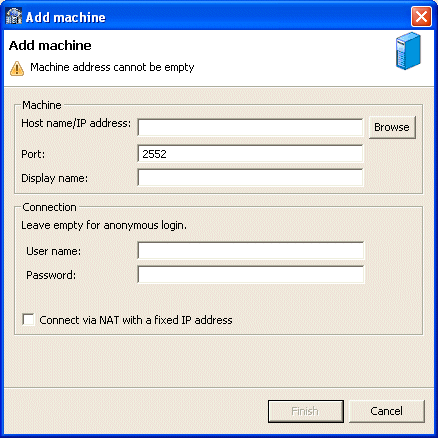
The Add machine screen opens, as shown in Figure 2-1.
Enter the following information in each field:
-
Host name/IP address: Enter the name of the machine on the network or click Browse, to browse all the machines running a daemon listener on the specified port currently accessible over the network.
-
Port: Enter the port number where the daemon is running. The default port is 2551.
-
Display name: Enter an alias used to identify the machine when different from the host name (optional).
-
User name: Enter the machine administrator's user name.
-
Password: Enter the machine administrator's password. This is the password for the user entered in the User name field. If no password is necessary to access this machine, do not enter anything.
-
Connect via NAT with fixed IP address: Select this if the machine uses the NAT (Network Address Translation) firewall protocol, with a fixed configuration, mapping each external IP to one internal IP, regardless of the port specified.
-
Click Finish.
The computer is displayed in the Configuration view, in the Machine folder. You can edit the machine's login information, or configure bindings, daemons, and users for each machine.
2.2 Setting Up a VSAM Data Source
Oracle Connect for IMS, VSAM, and Adabas Gateways supports the following types of VSAM data sources:
-
VSAM (CICS): The VSAM under CICS data source accesses VSAM by making calls from the external CICS interface (EXCI) to a CICS program that is provided as part of the Oracle Connect for IMS, VSAM, and Adabas Gateways installation. This CICS program does the actual VSAM reads and writes from within CICS.
When you access VSAM data using this data source, the following restrictions apply:
-
SQL DELETE operations are not supported for ESDS files.
-
Using an alternate index to access an entry sequenced data set (ESDS) file is not supported.
-
A non-unique alternate index for a key sequenced data set (KSDS) file is not supported.
-
VSAM/Batch: This data source connects directly to the VSAM data and is limited if the VSAM files are managed by CICS. In this case, it is recommended to use this data source for read-only access to VSAM files. However, this may not give you adequate read integrity if some changes are buffered by CICS. Another alternative is to use the VSAM under CICS data source.
When you access VSAM data using the VSAM data source, the following restrictions apply:
-
Transactions are not supported when you access VSAM directly. When you access VSAM under CICS, global transactions are supported.
-
Locking is not supported.
-
You cannot update an array value (a child record in a hierarchical table) when the parent record is included in the SQL in a subquery.
-
SQL DELETE operations are not supported for ESDS files.
-
An relative record data set (RRDS) file cannot have an alternate index.
-
The primary key of a KSDS file must be one segment only (however, it can be several consecutive fields). You cannot modify the primary key value of a KSDS file.
This section describes how to set up a VSAM data source using Oracle Studio for IMS, VSAM, and Adabas Gateways. It includes the following tasks:
2.2.1 Defining the VSAM Data Source Connection
Perform the following steps to define the connection to the VSAM data source.
-
In Oracle Studio for IMS, VSAM, and Adabas Gateways, in the Configuration view of the Design perspective, open the binding of the machine where the data is located.
-
Right-click Data Source and select New Data Source.
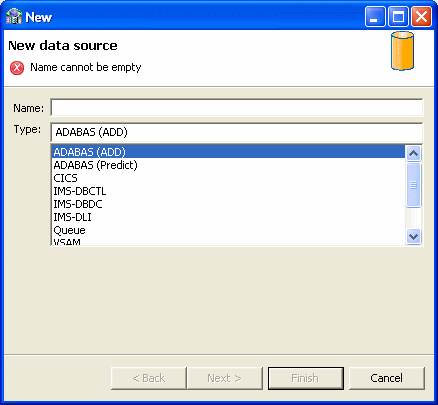
The New Data Source screen opens, as shown inFigure 2-2.
-
Specify a name for the data source in the Name field.
Note:
The name you assign to each data source that you define must be noted and used consistently throughout all phases of the gateway configuration.
-
From the Type list, select VSAM and click Next.
Click Next.
-
Specify the connect string as follows:
-
Data HLQ: The high-level qualifier where the data files are located.
-
Disk Volume Name: The high-level qualifier (volume) where the data is located.
The values specified are used in the Data File field in the Oracle Studio for IMS, VSAM, and Adabas Gateways Design Perspective Metadata tab. For tables created using the CREATE TABLE statement, the values specified are used to create the data files. If values are not specified, then data files are written to the DEF high-level qualifier under the high-level qualifier where Oracle Connect for IMS, VSAM, and Adabas Gateways is installed.
When SMS is used to manage the volumes, leave this value empty and set the newFileSMSStorageClass and newFileSMSDataClass properties as described in VSAM Data Source Parameters.
-
Click Finish.
2.2.2 Defining the VSAM (CICS) Data Source Connection
Perform the following steps to define the connection to the VSAM (CICS) data source:
-
In Oracle Studio for IMS, VSAM, and Adabas Gateways, in the Configuration view of the Design perspective, open the binding of the machine where the data is located.
-
Right-click Data Source and select New Data Source.
The New Data Source screen opens, as shown in Figure 2-3.
-
Specify a name for the data source in the Name field.
-
From the Type list, select VSAM (CICS) and click Next.
The Data Source Connect String screen is displayed.
-
Specify the connect string as follows:
-
CICS Application ID: The VTAM applied of the CICS target system. The default value is CICS. This parameter is used when updating VSAM data. You can determine this value by activating the CEMT transaction on the target CICS system. In the bottom right corner of the screen appears the legend APPLID=target_system.
-
Transaction ID: The mirror transaction within CICS that receives control through MRO, which transfers the transaction from the Oracle Connect for IMS, VSAM, and Adabas Gateways environment to CICS. The default value is EXCI.
-
VTAM Netname: The VTAM netname of the specific connection being used by EXCI (and MRO) to relay the program call to the CICS target system. For example, if you issue the following command to CEMT:
CEMT INQ CONN
Then you see on the display screen that the netname is BATCHCLI (this is the default connection supplied by IBM upon the installation of CICS). The default value is ATYCLIEN.
If you plan to use the IBM defaults, specify BATCHCLI as the VTAM_netname parameter, otherwise define a specific connection (with EXCI protocol) and use the netname you provided there for this parameter.
-
Oracle provides a netname, ATYCLIEN that can be used after the following procedure is followed:
Either, use the JCL in the NAVROOT.USERLIB(CICSCONF) member to submit the DFHCSDUP batch utility program to add the resource definitions to the DFHCSD dataset (see the IBM CICS Resource Definition Guide for further details).
or:
Use the instream SYSIN control statements in the NAVROOT.USERLIB(CICSCONF) member as a guide to defining the resources online using the CEDA facility.
-
After the definitions have been added (through batch or using the CEDA facility), logon to CICS and issue the following command to install the resource definitions under CICS:
CEDA INST GROUP(ATYI)
Henceforth, specify ATYCLIEN as the NETNAME.
-
Program Name: The UPDTRNS program that is supplied with Oracle Connect for IMS, VSAM, and Adabas Gateways to enable updating VSAM data. To use the UPDTRNS program, copy the program from NAVROOT.LOAD to a CICS DFHRPL library (such as CICS.USER.LOAD) and then define the UPDTRNS program under CICS using any available group:
CEDA DEF PROG(UPDTRNS) G(group_name) LANG(C) DA(ANY) DE(ATTUNIT VSAM UPDATE PROG)
NAVROOT is the high-level qualifier where Oracle Connect for IMS, VSAM, and Adabas Gateways is installed.
After defining the UPDTRNS program, install it as follows:
CEDA IN G(group_name)
-
Trace Queue: The name of the queue for output that is defined under CICS when tracing the output of the UPDTRNS program. When not defined, the default CICS queue is used.
-
Click Finish.
2.2.3 Configuring the VSAM or VSAM (CICS) Data Source Properties
After defining the connection to the VSAM (CICS) data source, perform the following steps to configure the data source properties.
-
In Oracle Studio for IMS, VSAM, and Adabas Gateways, in the Configuration view of the Design perspective, right-click the data source and select Edit Data Source.
-
In the editor, on the Properties tab, configure the data source parameters as required. For a description of the available parameters, see "VSAM Data Source Parameters" or "VSAM (CICS) Data Source Parameters".
-
If you want to configure VSAM (CICS) to support rollback, on the Advanced tab, from the Transaction type list, select 1PC or 2PC, depending on the data source usage.
If you do not use 2PC, see the Oracle Database Heterogeneous Connectivity Administrator's Guide for configuration information.
-
On the Advanced tab, configure how arrays will be handled by selecting the relevant check boxes in the Virtual View Policy section. The following options are available:
-
Generate sequential view: Select this option if you want to map a non-relation file to a single table.
-
Generate virtual views: Select this option if you want to have an individual table created for every array in the non-relational file.
-
Include row number column: Select this option if you want to include a column that specifies the row number in the virtual or sequential view.
-
Inherit all parent columns: Select this option if you want the virtual views to include all the columns of the parent record.
-
Save your settings.
2.2.3.1 VSAM Data Source Parameters
The following parameters can be configured for VSAM data sources in the Properties tab of the Configuration Properties screen:
-
disableExplicitSelect=true|false: When set to true, this parameter disables the ExplicitSelect ADD attribute; every field is returned by a SELECT * FROM... statement.
-
filepoolCloseOnTransaction=true|false: This parameter specifies that all files in the file pool for this data source close at each end of transaction (commit or rollback).
-
filepoolSize=n: This parameter specifies how many instances of a file from the file pool may be open concurrently.
-
newFileLocation=string: This parameter is the Data HLQ in the connect string that specifies the high-level qualifier for the file.
-
newFileSMSStorageClass=string: This parameter specifies the storage class when SMS is used to manage volumes.
-
newFileSMSDataClass=string: This parameter specifies the data class when SMS is used to manage volumes.
-
newFileVolume=string: This parameter specifies the file volume where the file is catalogued (data disk in the connect string).
-
useGlobalFilepool=true|false: This parameter specifies whether or not a global file pool that can span more than one session is used.
2.2.3.2 VSAM (CICS) Data Source Parameters
The following parameters can be configured for VSAM (CICS) data sources in the Properties tab of the Configuration Properties screen:
-
allowUpdateKey=true|false: When set to true, this parameter specifies that the key is updatable.
-
cicsProgname=string: The ProgramName in the connect string, this parameter specifies the UPDTRNS program that is supplied with Oracle Connect for IMS, VSAM, and Adabas Gateways to enable updating VSAM data.
-
cicsTraceQueue=string: The TraceQueue in the connect string, this parameter indicates the name of queue for output that is defined under CICS when tracing the output of the UPDTRNS program. When not defined, the default CICS queue is used.
-
disableExplicitSelect=true|false: When set to true, this parameter disables the ExplicitSelect ADD attribute; every field is returned by a SELECT * FROM... statement.
-
exciTransid=string: The Transaction ID in the connect string, this parameter indicates the CICS TRANSID. This value must be EXCI or a copy of this transaction.
-
targetSystemApplid=string: The CICS Application ID in the connect string, this parameter specifies the VTAM applid of the CICS target system.
-
TransactionType=true|false: When set to true, this parameter specifies that the key is updatable.
-
vtamNetname=string: The VTAM Netname in the connect string, this parameter specifies the connection being used by EXCI (and MRO) to relay the program call to the CICS target system.
2.3 Setting Up the Metadata of the VSAM Data Source
Defining VSAM metadata by using the Import Manager of Oracle Studio for IMS, VSAM, and Adabas Gateways requires a COBOL copybook that contains the COBOL definition of the VSAM records.
If the metadata is provided in a number of COBOL copybooks with different filter settings, such as whether the first 6 columns are ignored or not (see Apply Filters), first import the metadata from copybooks with the same settings, and then import the metadata from the other copybooks.
The import process includes the following tasks:
-
Import the COBOL Copybooks
-
Apply Filters
-
Select Tables
-
Manipulate the Imported Tables
-
Create VSAM Indexes
-
Assign Index File Names
-
Select the Metadata Model
-
Import the Metadata
2.3.1 Import the COBOL Copybooks
This section describes the steps required to import the COBOL copybooks that will be used to generate the metadata. You can import new copybooks or use copybooks that you already imported earlier.
To import new copybooks, perform the following procedure.
-
In the Configuration view, right-click the data source and select Edit Metadata.
The Metadata tab is displayed with the data source displayed in the Metadata view.
-
Right-click the Imports node under the data source and select New Import.
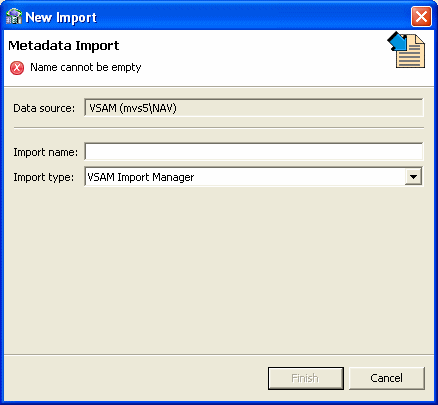
The Metadata Import screen opens, as shown in Figure 2-4:
-
Enter a name for the import. The name can contain letters, numbers and the underscore character.
-
Select VSAM Import Manager or VSAM Under CICS Import Manager as the import type as required.
-
Click Finish.
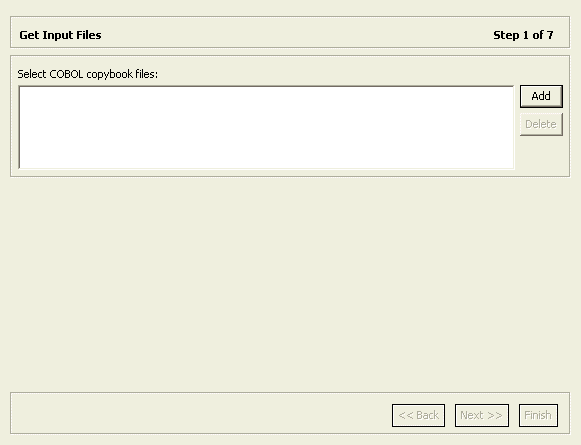
The Metadata import wizard opens with the Get Input Files screen, as shown in Figure 2-5:
-
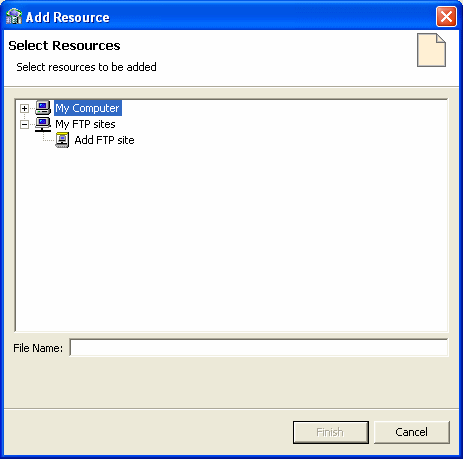
Click Add.
The Add Resource screen opens, as shown in Figure 2-6:
-
If the files are located on another computer, do any of the following:
-
Right-click My FTP Sites and select Add.
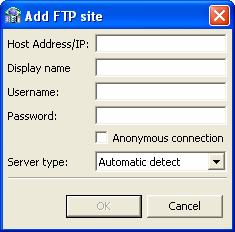
The Add FTP Site screen opens, as shown in the following figure.
-
Enter the server name where the COBOL copybooks are located and, if not using an anonymous connection, enter a valid username and password to access the computer. The username is then used as the high-level qualifier.
-
Click OK. After accessing the remote computer, you can change the high-level qualifier by right-clicking the machine in the Add Resource screen and selecting Change Root Directory.
-
Select the files to import and click Finish to start the file transfer. When complete, the selected files are displayed in the Get Input Files screen.
To remove any of these files, select the required file and click Remove.
-
Click Next.
The Apply Filters screen opens (see Apply Filters).
To use copybooks that you imported earlier, perform the following procedure.
-
In the Configuration view, right-click the data source and select Edit Metadata.
The Metadata tab is displayed with the data source displayed in the Metadata view.
-
Expand the Imports node under the data source, right-click the existing import, and select Open.
The Metadata import wizard opens with the Get Input Files screen, showing the copybooks that you imported.
-
Click Next.
The Apply Filters screen opens (see Apply Filters).
2.3.2 Apply Filters
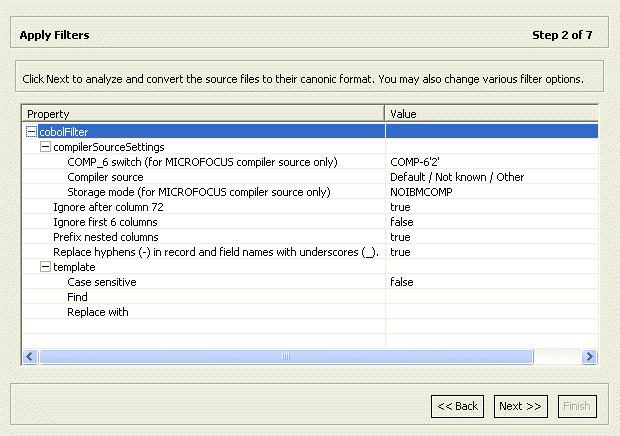
This section describes the steps required to apply filters on the COBOL copybooks used to generate the Metadata. It continues the Import the COBOL Copybooks procedure. Perform the following procedure.
-
Expand all nodes in the Apply Filters screen.
-
Apply the required filter attributes to the COBOL copybooks.
Table 2-1 describes the available filters.
-
Click Next.
The Select Tables screen opens (see Select Tables).
2.3.3 Select Tables
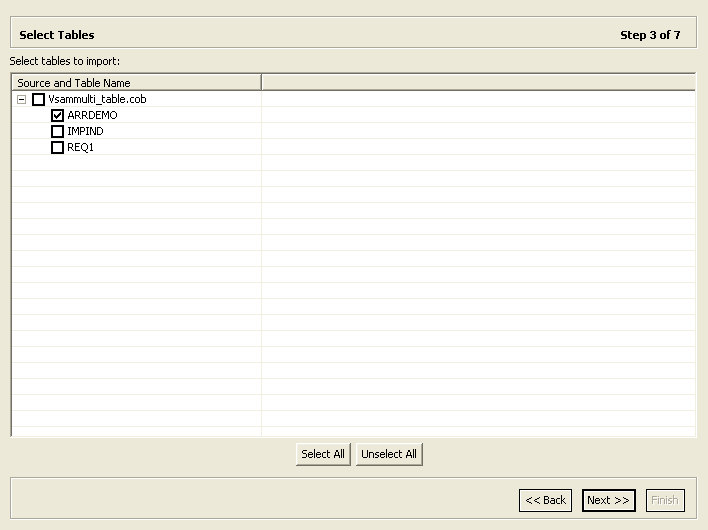
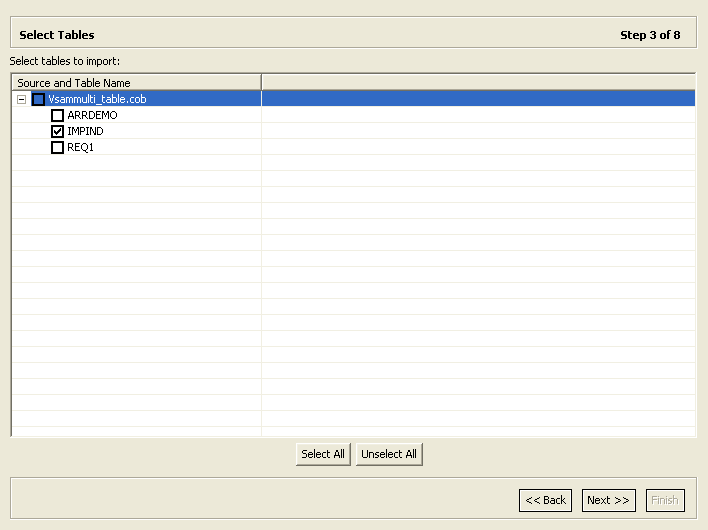
This section describes the steps required to select the tables from the COBOL copybooks. The import manager identifies the names of the records in the COBOL copybooks that will be imported as tables.
This task continues the Apply Filters task. Perform these steps to select the required tables.
-
From the Select Tables screen, select the tables that you want to access. To select all tables, click Select All. To clear the selection, click Unselect All.
-
Click Next.
The Import Manipulation screen opens (see Manipulate the Imported Tables).
2.3.4 Manipulate the Imported Tables
If required, you can now manipulate the imported tables. This is an optional task.
This section describes the operations available for manipulating the imported tables. It continues the Select Tables task.
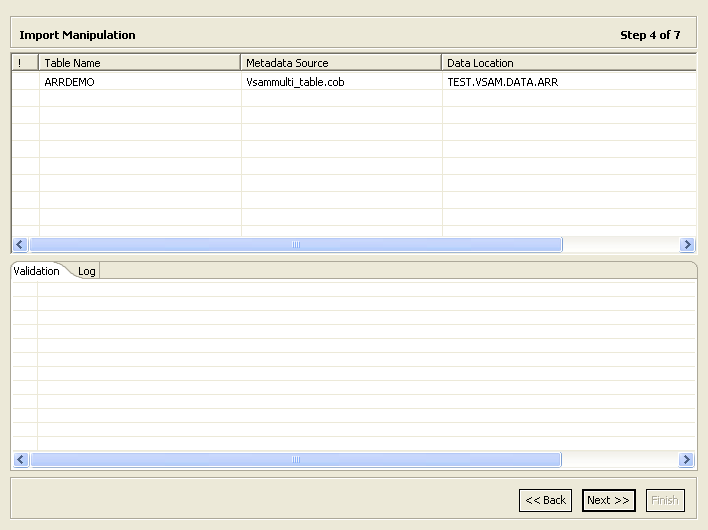
The import manager identifies 01 level names in the copybooks that will be imported as tables. You can manipulate the general table data in the Import Manipulation Screen.
Perform the following steps to manipulate the table metadata.
-
In the Data Location column, click the browse button to specify the data file location. The Select Resources dialog box opens.
-
In the File Name box, enter the location of the data file and click Finish.
-
From the Import Manipulation screen (for details, see Import Manipulation Screen), right-click the table record marked with a validation error and select the relevant operation. Table 2-2 describes the available operations.
-
Repeat step 1 for all tables marked with a validation error. You resolve the issues in the Import Manipulation Screen.
Once all the validation error issues have been resolved, the Import Manipulation screen is displayed with no error indicators.
-
Click Next to continue to the Create VSAM Indexes.
Import Manipulation Screen
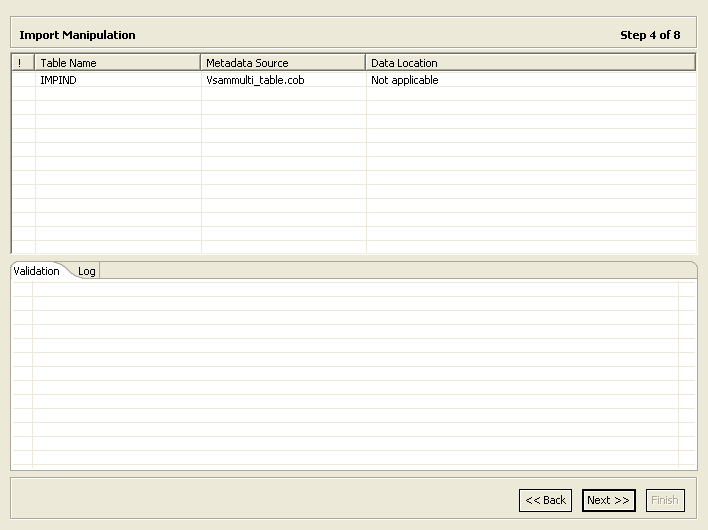
Figure 2-9 shows the Import Manipulation screen.
The upper area of the screen lists the table names and their validation status. The metadata source specifies the copybook in which the table is defined.
The Validation tab at the lower area of the screen displays information about what needs to be resolved to validate the tables and fields generated from the COBOL. The Log tab displays a log of what has been performed (such as renaming a table or specifying a data location).
The following operations are available in the Import Manipulation screen:
-
Resolving table names, where tables with the same name are generated from different files during the import.
-
Selecting the physical location for the data.
-
Selecting table attributes.
-
Manipulating the fields generated from the COBOL, as follows:
-
Merging sequential fields into one (for simple fields).
-
Resolving variants by either marking a selector field or specifying that only one case of the variant is relevant.
-
Adding, deleting, hiding, or renaming fields.
-
Changing a data type.
-
Setting the field size and scale.
-
Changing the order of the fields.
-
Setting a field as nullable.
-
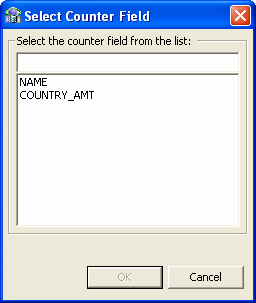
Selecting a counter field for array for fields with dimensions (arrays). You can select the array counter field from a list of potential fields.
-
Setting column-wise normalization for fields with dimensions (arrays). You can create new fields instead of the array field where the number of generated fields will be determined by the array dimension.
-
Creating arrays and setting the array dimension.
Table 2-2 describes the available operations when you right-click a table entry.
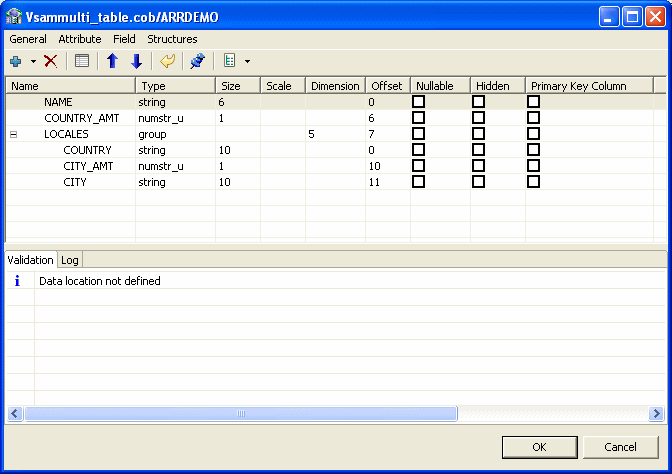
You can manipulate the data in the table fields in the Field Manipulation Screen. Double-click a line in the Import Manipulation Screen to open the Field Manipulation Screen.
Field Manipulation Screen
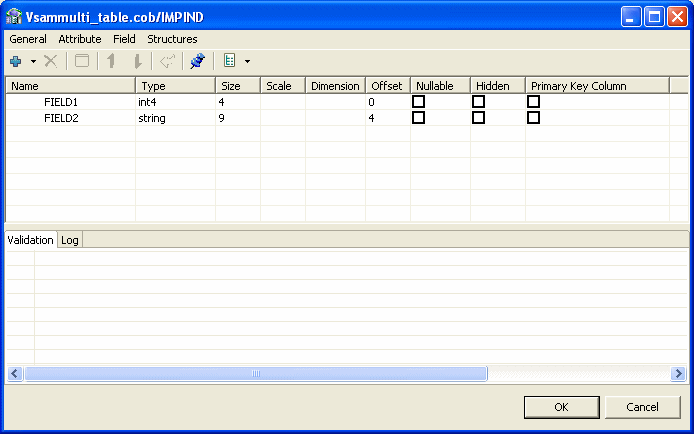
The Field Manipulation screen lets you make changes to fields in a selected table. You get to the Field Manipulation screen by double-clicking a table in the Import Manipulation Screen. The Field Manipulation screen is shown in Figure 2-10.
The values displayed in the table on the Field Manipulation screen are calculated by the import process.
You can carry out all of the available tasks in this screen through the menu or toolbar. You can also right-click anywhere in the screen and select any of the options available in the main menus from a shortcut menu. The following table describes the tasks that are done in this screen. If a toolbar button is available for a task, it is pictured in the table.
Table 2-3 describes the commands that are available in the Field Manipulation screen.
2.3.5 Create VSAM Indexes
Oracle Studio for IMS, VSAM, and Adabas Gateways automatically creates the VSAM indexes from the physical data file. Click Next to continue to the Select the Metadata Model task.
Note:
Oracle Studio for IMS, VSAM, and Adabas Gateways does not create any indexes for design machines.
2.3.6 Select the Metadata Model
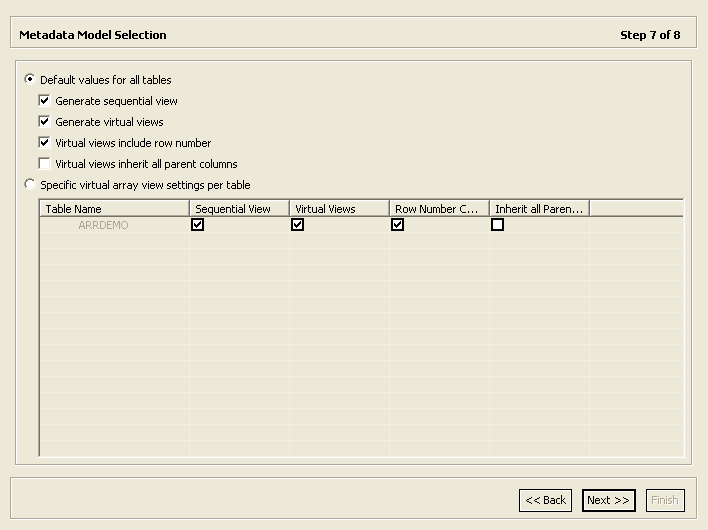
This screen allows you to generate virtual and sequential views for tables containing arrays. In addition, you can configure the properties of the generated views.
This screen continues the Create VSAM Indexes procedure.
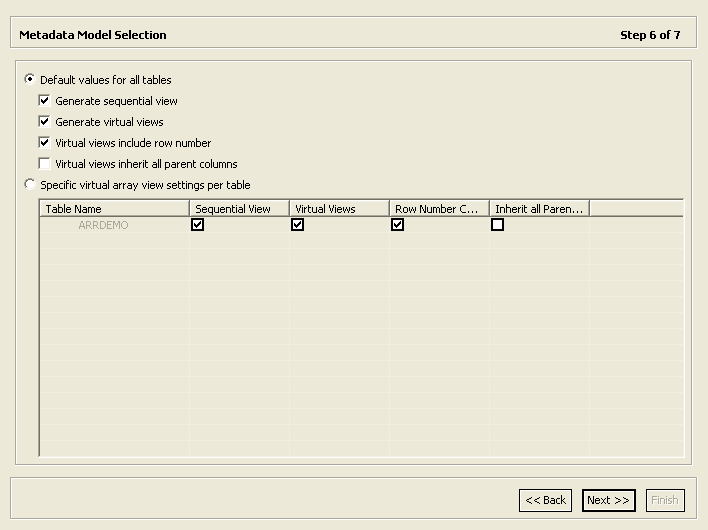
In the Metadata Model Selection screen, you can select default values that apply to all tables or set specific settings per table. This screen inherits its default settings from the settings that you defined for the virtual view policy when you configured the data source properties (see Configuring the VSAM or VSAM (CICS) Data Source Properties).
Note:
Selecting the
Default values for all tables check box discards any table-specific settings that you set.
Perform the following steps to select the metadata model.
-
Select from the following:
-
Default values for all tables: Select this option if you want to apply the same values to all tables to be imported.
-
Generate sequential view: Select this option if you want to map a non-relation file to a single table.
-
Generate virtual views: Select this option if you want to have an individual table created for every array in the non-relational file.
-
Virtual views include row number: Select this option if you want to include a column that specifies the row number in the virtual or sequential view.
-
Virtual views inherit all parent columns: Select this option if you want the virtual views to include all the columns of the parent record.
-
Specific virtual array view settings per table: Select this option if you want to apply different values to the tables to be imported. Then select the relevant check boxes.
Note:
After importing a table, you can change these settings on the
Modeling tab of the table editor.
-
Click Next to continue to the Import the Metadata task.
Figure 2-11 shows the Metadata Model Selection screen.
2.3.7 Import the Metadata
This section describes the steps required to import the metadata to the target computer. It continues the Assign Index File Names task.
You can now import the metadata to the computer where the data source is located, or import it later (in case the target computer is not available).
To import the metadata
-
Specify Yes to transfer the metadata to the target computer or No to transfer the metadata later.
-
Click Finish.
If you specified Yes, the metadata is imported to the target computer immediately.
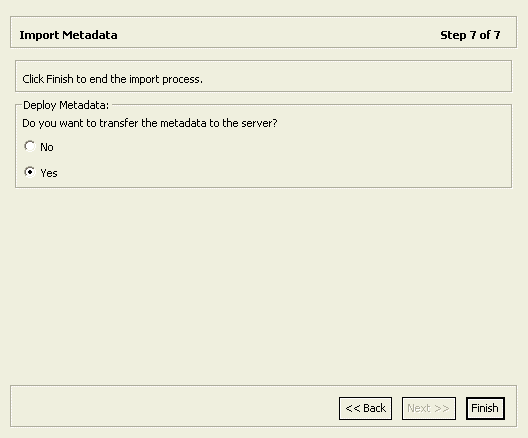
Figure 2-12 shows the Import Metadata screen.
2.4 Setting Up the Metadata of the VSAM (CICS) Data Source
Defining VSAM metadata by using the Import Manager of Oracle Studio for IMS, VSAM, and Adabas Gateways requires a COBOL copybook that contains the COBOL definition of the VSAM records.
If the metadata is provided in a number of COBOL copybooks with different filter settings, such as whether the first 6 columns are ignored or not (see Apply Filters), first import the metadata from copybooks with the same settings, and then import the metadata from the other copybooks.
The import process includes the following tasks:
-
Import the COBOL Copybooks
-
Apply Filters
-
Select Tables
-
Manipulate the Imported Tables
-
Create VSAM Indexes
-
Assign Index File Names
-
Select the Metadata Model
-
Import the Metadata
2.4.1 Import the COBOL Copybooks
This section describes the steps required to import the COBOL copybooks that will be used to generate the metadata. You can import new copybooks or use copybooks that you already imported earlier.
To import new copybooks, perform the following procedure.
-
In the Configuration view, right-click the data source and select Edit Metadata.
The Metadata tab is displayed with the data source displayed in the Metadata view.
-
Right-click the Imports node under the data source and select New Import.
The Metadata Import screen opens, as shown in Figure 2-4:
-
Enter a name for the import. The name can contain letters, numbers and the underscore character.
-
Select VSAM Import Manager or VSAM Under CICS Import Manager as the import type as required.
-
Click Finish.
The Metadata import wizard opens with the Get Input Files screen, as shown in Figure 2-5:
-
Click Add.
The Add Resource screen opens, as shown in Figure 2-6:
-
If the files are located on another computer, do any of the following:
-
Right-click My FTP Sites and select Add.
The Add FTP Site screen opens, as shown in the following figure.

-
Enter the server name where the COBOL copybooks are located and, if not using an anonymous connection, enter a valid username and password to access the computer. The username is then used as the high-level qualifier.
-
Click OK. After accessing the remote computer, you can change the high-level qualifier by right-clicking the machine in the Add Resource screen and selecting Change Root Directory.
-
Select the files to import and click Finish to start the file transfer. When complete, the selected files are displayed in the Get Input Files screen.
To remove any of these files, select the required file and click Remove.
-
Click Next.
The Apply Filters screen opens (see Apply Filters).
To use copybooks that you imported earlier, perform the following procedure.
-
In the Configuration view, right-click the data source and select Edit Metadata.
The Metadata tab is displayed with the data source displayed in the Metadata view.
-
Expand the Imports node under the data source, right-click the existing import, and select Open.
The Metadata import wizard opens with the Get Input Files screen, showing the copybooks that you imported.
-
Click Next.
The Apply Filters screen opens (see Apply Filters).
2.4.2 Apply Filters
This section describes the steps required to apply filters on the COBOL copybooks used to generate the Metadata. It continues the Import the COBOL Copybooks procedure. Perform the following procedure.
-
Expand all nodes in the Apply Filters screen.
-
Apply the required filter attributes to the COBOL copybooks.
Table 2-1 describes the available filters.
-
Click Next.
The Select Tables screen opens (see Select Tables).
2.4.3 Select Tables
This section describes the steps required to select the tables from the COBOL copybooks. The import manager identifies the names of the records in the COBOL copybooks that will be imported as tables.
This task continues the Apply Filters task. Perform these steps to select the required tables.
-
From the Select Tables screen, select the tables that you want to access. To select all tables, click Select All. To clear the selection, click Unselect All.
-
Click Next.
The Import Manipulation screen opens (see Manipulate the Imported Tables).
2.4.4 Manipulate the Imported Tables
If required, you can now manipulate the imported tables. This is an optional task.
This section describes the operations available for manipulating the imported tables. It continues the Select Tables task.
The import manager identifies 01 level names in the copybooks that will be imported as tables. You can manipulate the general table data in the Import Manipulation Screen.
Perform the following steps to manipulate the table metadata.
-
From the Import Manipulation screen (for details, see Import Manipulation Screen), right-click the table record marked with a validation error and select the relevant operation. Table 2-2 describes the available operations.
-
Repeat step 1 for all tables marked with a validation error. You resolve the issues in the Import Manipulation Screen.
Once all the validation error issues have been resolved, the Import Manipulation screen is displayed with no error indicators.
-
Click Next to continue to the Create VSAM Indexes.
Import Manipulation Screen
Figure 2-9 shows the Import Manipulation screen.
The upper area of the screen lists the table names and their validation status. The metadata source specifies the copybook in which the table is defined.
The Validation tab at the lower area of the screen displays information about what needs to be resolved to validate the tables and fields generated from the COBOL. The Log tab displays a log of what has been performed (such as renaming a table or specifying a data location).
The following operations are available in the Import Manipulation screen:
-
Resolving table names, where tables with the same name are generated from different files during the import.
-
Selecting the physical location for the data.
-
Selecting table attributes.
-
Manipulating the fields generated from the COBOL, as follows:
-
Merging sequential fields into one (for simple fields).
-
Resolving variants by either marking a selector field or specifying that only one case of the variant is relevant.
-
Adding, deleting, hiding, or renaming fields.
-
Changing a data type.
-
Setting the field size and scale.
-
Changing the order of the fields.
-
Setting a field as nullable.
-
Selecting a counter field for array for fields with dimensions (arrays). You can select the array counter field from a list of potential fields.
-
Setting column-wise normalization for fields with dimensions (arrays). You can create new fields instead of the array field where the number of generated fields will be determined by the array dimension.
-
Creating arrays and setting the array dimension.
Table 2-2 describes the available operations when you right-click a table entry.
You can manipulate the data in the table fields in the Field Manipulation Screen. Double-click a line in the Import Manipulation Screen to open the Field Manipulation Screen.
Field Manipulation Screen
The Field Manipulation screen lets you make changes to fields in a selected table. You get to the Field Manipulation screen by double-clicking a table in the Import Manipulation Screen. The Field Manipulation screen is shown in Figure 2-10.
The values displayed in the table on the Field Manipulation screen are calculated by the import process.
You can carry out all of the available tasks in this screen through the menu or toolbar. You can also right-click anywhere in the screen and select any of the options available in the main menus from a shortcut menu. The following table describes the tasks that are done in this screen. If a toolbar button is available for a task, it is pictured in the table.
Table 2-3 describes the commands that are available in the Field Manipulation screen.
2.4.5 Assign File Names
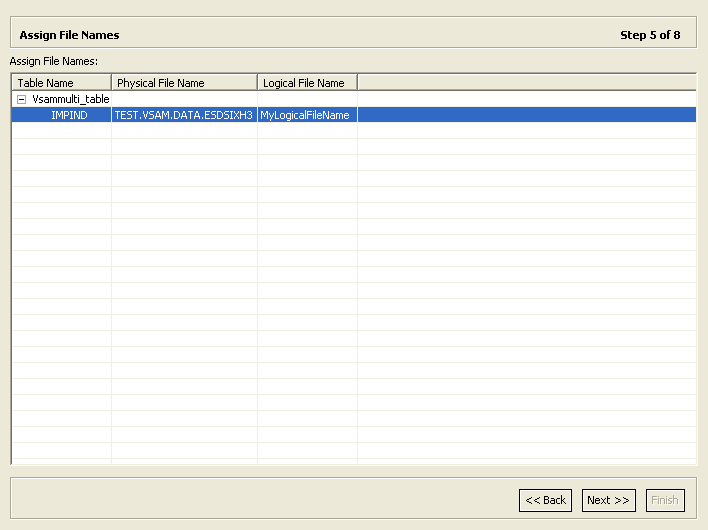
This section describes the steps required to specify the physical file name and the corresponding logical CICS file name for each VSAM table. It continues the Manipulate the Imported Tables task.
To assign file names
-
In the Assign File Names screen, enter the name of an existing physical VSAM file for each table listed.
Oracle Studio for IMS, VSAM, and Adabas Gateways needs the physical VSAM file name to be able to create a list of its alternate indexes in the Assign Index File Names task.
-
Specify the CICS logical file name for each physical file.
-
Click Next to continue to the Assign Index File Names task.
The Assign Index File Names screen opens.
Figure 2-20 shows the Assign File Names screen.
2.4.6 Assign Index File Names
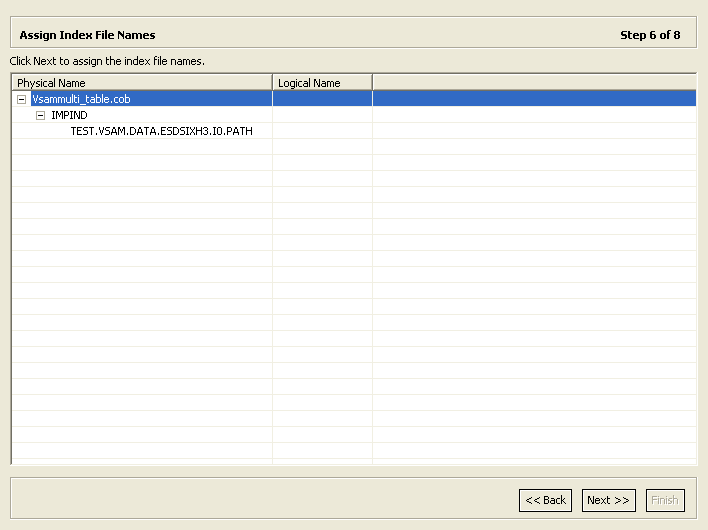
This section describes the steps required to specify the logical CICS names of the alternate indexes. It continues the Create VSAM Indexes task.
To assign the logical CICS index names
-
Specify the logical CICS alternate index name for each alternate index listed.
-
Click Next to continue to the Select the Metadata Model task.
The Import Metadata screen opens.
Figure 2-21 shows the Assign Index File Names screen.
2.4.7 Select the Metadata Model
This screen allows you to generate virtual and sequential views for tables containing arrays. In addition, you can configure the properties of the generated views.
This screen continues the Assign Index File Names procedure.
In the Metadata Model Selection screen, you can select default values that apply to all tables or set specific settings per table. This screen inherits its default settings from the settings that you defined for the virtual view policy when you configured the data source properties (see Configuring the VSAM or VSAM (CICS) Data Source Properties).
Note:
Selecting the
Default values for all tables check box discards any table-specific settings that you set.
Perform the following steps to select the metadata model.
-
Select from the following:
-
Default values for all tables: Select this option if you want to apply the same values to all tables to be imported.
-
Generate sequential view: Select this option if you want to map a non-relation file to a single table.
-
Generate virtual views: Select this option if you want to have an individual table created for every array in the non-relational file.
-
Virtual views include row number: Select this option if you want to include a column that specifies the row number in the virtual or sequential view.
-
Virtual views inherit all parent columns: Select this option if you want the virtual views to include all the columns of the parent record.
-
Specific virtual array view settings per table: Select this option if you want to apply different values to the tables to be imported. Then select the relevant check boxes.
Note:
After importing a table, you can change these settings on the
Modeling tab of the table editor.
-
Click Next to continue to the Import the Metadata task.
Figure 2-11 shows the Metadata Model Selection screen.
2.4.8 Import the Metadata
This section describes the steps required to import the metadata to the target computer. It continues the Assign Index File Names task.
You can now import the metadata to the computer where the data source is located, or import it later (in case the target computer is not available).
To import the metadata
-
Specify Yes to transfer the metadata to the target computer or No to transfer the metadata later.
-
Click Finish.
If you specified Yes, the metadata is imported to the target computer immediately.
Figure 2-12 shows the Import Metadata screen.


