| Oracle® Warehouse Builder User's Guide 11g Release 1 (11.1) Part Number B31278-01 |
|
|
View PDF |
| Oracle® Warehouse Builder User's Guide 11g Release 1 (11.1) Part Number B31278-01 |
|
|
View PDF |
Scenario
Your company relies on a legacy system that writes data to a flat file on a daily basis and assigns a unique name to the file based on the date and time of its creation. You would like to create a mapping that uses the generated flat files as a source, and transforms and loads the data to a relational database. However, mappings require files to have permanent names and, in this situation, the name of the source file changes each time the file is created.
Solution
In Warehouse Builder, you can design a process flow that locates the generated file in a specific directory, renames it to a permanent name you designate, and starts a dependent mapping. You can now use the permanent flat file name as the source for your mapping.
Case Study
This case study describes how to create a process flow and a mapping to extract data from a legacy system that generates flat files with variable names. The process flow relies on the use of an external process activity. Assume the following information for the purposes of this case study:
Generated Flat File: The legacy system generates a flat file containing sales data on a daily basis. It saves the file to c:\staging_files directory and names the file based on the time and date, such as sales010520041154.dat. Every generated file is saved to the same directory and begins with the word sales, followed by the timestamp information.
Permanent Flat File Name: You decide to rename the generated file name to s_data.dat. This is the name you reference as the flat file source in the mapping.
Process Activity: You design a process flow named OWF_EXT to execute batch commands in DOS that copies the generated file, saves it as s_data.dat, and deletes the originally generated file.
Your objective is to create logic that ensures the generated flat file is renamed appropriately before it triggers the execution of a mapping.
To extract data from a generated flat file with a name that varies with each generation, refer to the following sections:
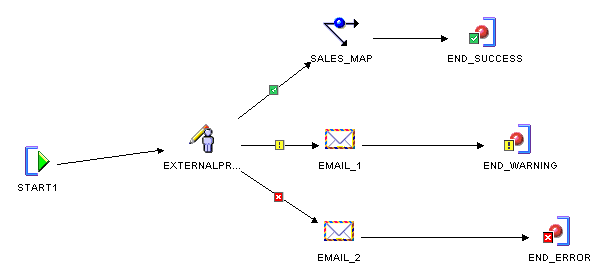
Create a process flow that starts a mapping on the condition that the external process activity completes successfully. Your process flow should resemble Figure 18-1. For more information on creating the process flow, refer to "Instructions for Defining Process Flows".
Figure 18-1 Process Flow with External Process Transitioning to a Mapping
This section describes how to specify the DOS commands for renaming the generated file. The DOS commands you issue from the external process activity should be similar to the following:
copy c:\staging_files\sales*.* c:\staging_files\s_data.dat
del c:\staging_files\sales*.*
The first command copies the temporary file into a file with a fixed name s_data.dat. The second command deletes the originally generated file.
You can either direct Warehouse Builder to a file containing the script of commands or you can store the commands in the Warehouse Builder user interface. Choose one of the following methods:
Choose this method when you want to maintain the script in Warehouse Builder. Consider using this method when the script is small and need not be very flexible.
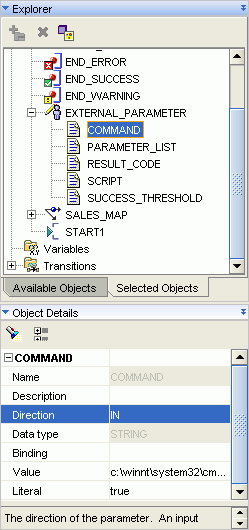
For this method, write or copy and paste the script into the Value column of the SCRIPT parameter. In the COMMAND parameter, type the path to the DOS shell command such as c:\winnt\system32\cmd.exe. Also, type the ${Task.Input} variable into the Value column of the PARAMETER_LIST parameter. Your Activity View should resemble Figure 18-2.
Figure 18-2 External Process Parameters When Script Maintained in this Product
Although this case study does not illustrate it, you can use substitution variables in the script when you maintain it in Warehouse Builder. This prevents you from having to update activities when server files, accounts, and passwords change.
Table 18-1 lists the substitute variables you can type for the external process activity. Working refers to the computer hosting the Runtime Service, the local computer in this case study. Remote refers to a server other than the Runtime Service host. You designate which server is remote and local when you configure the activity as described in "Configuring the External Process Activity". These values are set when you register the locations at deployment.
Table 18-1 Substitute Variables for the External Process Activity
| Variable | Value |
|---|---|
|
${Working.Host} |
The host value for the location of the Runtime Service host. |
|
${Working.User} |
The user value for the location of the Runtime Service host. |
|
${Working.Password} |
The password value for the location of the Runtime Service host. |
|
${Working.RootPath} |
The root path value for the location of the Runtime Service host. |
|
${Remote.Host} |
The host value for a location other than the Runtime Service host. |
|
${Remote.User} |
The user value for a location other than the Runtime Service host. |
|
${Remote.Password} |
The password value for a location other than the Runtime Service host. |
|
${Remote.RootPath} |
The root path value for a location other than the Runtime Service host. |
|
${Deployment.Location} |
The deployment location. |
If extra maintenance is not an issue, you can point Warehouse Builder to a file containing a script including the necessary commands. This method is more flexible as it enables you to pass in parameters during execution of the process flow.
The following example shows how to call an external process script outside of Warehouse Builder and illustrates how to pass parameters into the script during execution of the process flow. This example assumes a Windows operating system. For other operating systems, issue the appropriate equivalent commands.
To call a script outside the external process activity:
Write the script and save it on the file directory. For example, you can write the following script and save it as c:\staging_files\rename_file.bat:
copy c:\staging_files\%1*.dat c:\staging_files\s_data.datdel c:\staging_files\%1*.dat
In this sample script, we pass a parameter %1 to the script during the execution of the process flow. This parameter represents a string containing the first characters of the temporary file name, such as sales010520041154.
Select the start activity on the canvas to view and edit activity parameters in the Available Objects tab of the Explorer panel displayed in the Process Flow Editor.
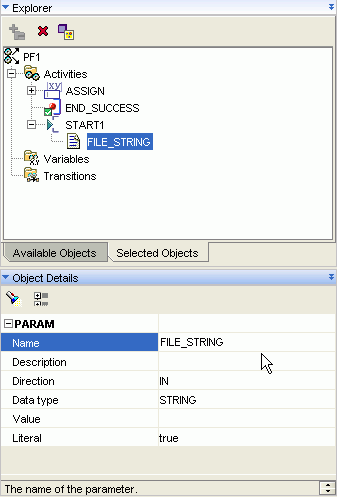
To add a start parameter, click Add on the upper left corner of the Explorer pane in the Available Objects tab. Create a start parameter named FILE_STRING as shown in Figure 18-3. During execution, Warehouse Builder will prompt you to type a value for FILE_STRING to pass on to the %1 parameter in the rename_file.bat script.
Figure 18-3 Start Activity in the Activity View
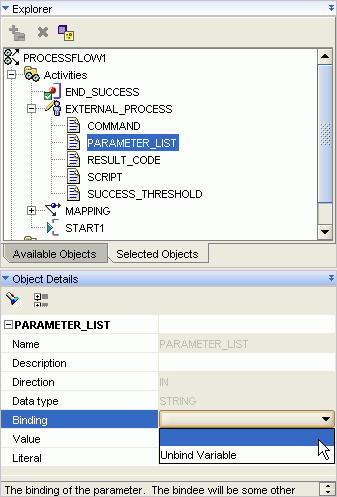
Select the external process activity on the canvas and edit its parameters as shown in Figure 18-4.
For the COMMAND parameter, type the path to the script in the column labeled Value. If necessary, use the scroll bar to scroll down and reveal the column. For this example, type c:\staging_files\rename_file.bat.
For PARAMETER_LIST, click the row labeled Binding and select the parameter you defined for the start activity, FILE_STRING
Accept the defaults for all other parameters for the external process. Your Activity View for the external process activity should resemble Figure 18-4.
Figure 18-4 External Process Parameters When Calling an Outside Script
When you apply conditions to the outgoing transitions of an external process, you must define the meaning of those conditions when you configure the external process activity.
To configure the external process activity:
Right-click the process flow on the navigation tree and select Configure.
Expand the external process activity and the Path Settings. Warehouse Builder displays the configuration settings.
Complete this step if you wrote the script in the Warehouse Builder user interface using the substitution variables related to Remote Location, Working Location, and Deployment Location as listed in Table 18-1. Use the list to select the values.
Because this case study does not use substitution variables, accept the defaults values.
Set the Deployed Location to the computer where you deploy the process flow.
Select Use Return as Status.
This ensures that the process flow uses the external process return codes for determining which outgoing transition to activate. For the process flow in this case study, shown in Figure 18-1, if the external process returns a success value, the process flow continues down the success transition and executes the downstream mapping.
Now you can design a mapping with s_data.dat as the source. You can create a PL/SQL mapping or a SQL*Loader mapping. For a PL/SQL, map the flat file source to an external table and design the rest of the mapping with all the operators available for a PL/SQL mapping. For SQL*Loader, map the flat file source to a staging table and limit the mapping to those operators permitted in SQL*Loader mappings.
Deploy the mapping. Also, deploy the process flow package or module containing the process flow OWF_EXT.
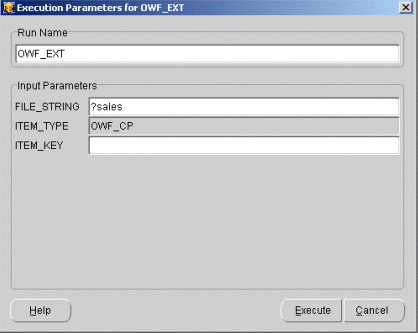
Execute the process flow manually. When you execute the process flow, Warehouse Builder prompts you to type values for the parameter you created to pass into the script, FILE_STRING For this case study, type ?sales where the question mark is the separator, as shown in Figure 18-5. The external activity then executes the command rename_file.bat sales.
Figure 18-5 External Process Activity in the Activity View
After you successfully execute the process flow manually, consider creating a schedule.You can define a daily schedule to execute the process flow and therefore the mapping.
Use schedules to plan when and how often to execute operations such as mappings and process flows that you deploy through Warehouse Builder.
To create a scheduler:
Right-click the Schedules node in the Project Explorer and select New.
Warehouse Builder displays the Welcome page for the Create Module Wizard.
Click Next.
On the Name and Description page, type a module name that is unique within the project. Enter an optional text description.
Click Next.
The wizard displays the Connection Information page.
You can accept the default location that the wizard creates for you based on the module name. Or, select an existing location from the location list. Click Edit to type in the connection information and test the connection.
Click Next.
The wizard displays the Summary page. Verify the name and status of the new Scheduler module.
When you click Finish, Warehouse Builder stores the definition for the module and inserts its name in the Project Explorer, and prompts you to create a schedule.