| United States |
|
| Previous | Contents | Index |
This chapter describes the guidelines and procedures for customizing
your language environment. It includes sections on changing your C
header files to work with C++, using 32-bit pointers, organizing your
C++ files, interfacing to other programming languages, and designing
upwardly compatible C++ classes.
C header files that already conform to ANSI C standards must be
slightly modified for use by Compaq C++ programs. In particular, be
sure to address the following issues:
The following sections provide details on how to properly modify your
header files.
To modify header files, use conditional compilation and the
extern
specifier.
When programming header files to be used for both C and C++ programs,
use the following convention for predefined macros. The system header
files also provide an example of correct usage of the predefined macros.
3.1 Using Existing C Header Files
3.1.1 Providing C and C++ Linkage
#if defined __cplusplus
    /* If the functions in this header have C linkage, this
     * will specify linkage for all C++ language compilers.
     */
    extern "C" {
#endif

extern int func1(int);
extern int func2(int);
   .
   .
   .
#if defined __cplusplus
    }   /* matches the linkage specification at the beginning. */
#endif
|
See §r.7.4 of The C++ Programming Language, 2nd Edition for more information on linkage
specifications.
3.1.2 Resolving C++ Keyword Conflicts
If your program uses any of the following C++ language keywords as identifiers, you must replace them with nonconflicting identifiers:
| asm | friend | private | this |
| catch | inline | protected | throw |
| class | new | public | try |
| delete | operator | template | virtual |
Distinctions between ANSI C and C++ include slight differences in rules concerning scope. Therefore, you may need to modify some ANSI C header files to use them with C++.
The following sample code fragment generates an error regarding incompatible types, but the root cause is the difference in scope rules between C and C++. In ANSI C, the compiler promotes tag names defined in structure or union declarations to the containing block or file scope. This does not happen in C++.
struct Screen {
  struct _XDisplay *display;
};
typedef struct _XDisplay {
  // ...
} Display;

struct Screen s1;
Display      *s2;

main()
{
  s1.display = s2;
}
|
The offending line in this sample is s1.display = s2 . The types of s1.display and s2 are the same in C but different in C++. You can solve the problem by adding the declaration struct _XDisplay; to the beginning of this code fragment, as follows:
struct _XDisplay; // this is the added line
struct Screen {
struct _XDisplay *display;
};
typedef struct _XDisplay {
  // ...
} Display;
// ...
|
DEC C has special built-in macros defined in the header files <stdarg.h> and <varargs.h> . These step through the argument list of a routine.
Programs that take the address of a parameter, and use pointer
arithmetic to step through the argument list to obtain the value of
other parameters, assume that all arguments reside on the stack and
that arguments appear in increasing order. These assumptions are not
valid for Compaq C++. Furthermore, the macros in
<varargs.h>
can be used only by C functions with old-style definitions that are not
legal in C++. To reference variable-length argument lists, use the
<stdarg.h>
header file.
3.2 Using Compaq C++ with Other Languages
The following are suggestions regarding the use of Compaq C++ with other languages:
extern "C" int myroutine(int, float); |
cxx -c tiny.cxx cxx -v tiny.o |
/usr/lib/cmplrs/cxx/cc -G 8 -g0 -O1 -call_shared \
        /usr/lib/cmplrs/cxx/_main.o tiny.o -v -lcxxstd -lcxx -lexc \
        |& /usr/lib/cmplrs/cxx/demangle
|
/usr/lib/cmplrs/cc/ld -g0 -O1 -call_shared /usr/lib/cmplrs/cc/crt0.o \
        /usr/lib/cmplrs/cxx/_main.o tiny.o -lcxxstd -lcxx -lexc -lc
|
/usr/lib/cmplrs/cxx/_main.o -lcxxstd -lcxx -lexc |
/usr/lib/cmplrs/cc/crt0.o ... -lc |
With linkage specifications, you can both import code and data written
in other languages into a Compaq C++ program and export
Compaq C++ code and data for use with other languages. See §4.4
of The C++ Programming Language, 2nd Edition for details on the
extern "C"
declaration.
3.4 How to Organize Your C++ Code
This section explains the best way for Compaq C++ users to organize
an application into files; it assumes that you are using automatic
instantiation to instantiate any template classes and functions.
3.4.1 Code That Does Not Use Templates
The general rule is to place declarations in header files and place definitions in library source files. Thus, the following items belong in header files:
The following items belong in library source files:
Header files should be directly included by modules that need them. Because several modules may include the same header file, a header file must not contain definitions that would generate multiply defined symbols when all the modules are linked together.
Library source files should be compiled individually and then linked into your application. Because each library source file is compiled only once, the definitions it contains will exist in only one object module and multiply defined symbols are thus avoided.
For example, to create a class called "array" you would create the following two files:
Header file, array.h:
// array.h
#ifndef ARRAY_H
#define ARRAY_H

class array {
private:
        int curr_size;
        static int max_array_size;
public:
        array() :curr_size(0) {;}
        array(int);
};

#endif
|
Library source file, array.cxx:
// array.cxx
#include "array.h"

int array::max_array_size = 256;

array::array(int size) :  curr_size(size) { ...;  }
|
You would then compile the array.cxx library source file using the following command:
cxx -I./include array.cxx |
The resulting object file could either be linked directly into your application or placed in a library (see Section 3.4.4).
Note that the header file uses header guards, which is
a technique to prevent multiple inclusion of the same header file.
3.4.2 Code That Uses Templates
With the widespread use of templates in C++, determining the proper place to put declarations and definitions becomes more complicated.
Two new types of header files are introduced in Chapter 5: template declaration files and template definition files. Again, the general rule is to place declarations in template declaration files and definitions in template definition files.
Thus, the following items belong in template declaration files:
The following items belong in template definition files:
These guidelines also apply to nontemplate nested classes inside of template classes.
Do not place definitions of nontemplate class members, nontemplate functions, or global data within template definition files; these must be placed in library source files. |
The first three items in the previous list can optionally be placed at the bottom of the template declaration file that contains the corresponding declarations. This will not incur multiply defined symbols when the template declaration file is included by multiple modules. However, this option does not apply to template specialization definitions; these must be placed in a definition template file, or optionally they can be treated as nontemplate code and placed in a library source file as described in Section 3.4.1.
The template definition file should have the same base name as the template declaration file but with a different file extension (such as .cxx ). Your template declaration files and template definition files should be placed in the same directory.
For example, the array class from Section 3.4.1, modified to use templates, would now look as follows:
Template declaration file, array.h:
// array.h
#ifndef ARRAY_H
#define ARRAY_H

template <class T>
class array {
private:
        int curr_size;
        static int max_array_size;
public:
        array() :curr_size(0) {;}
        array(T);
};

#endif
|
Template definition file, array.cxx:
// array.cxx
template <class T>
int array<T>::max_array_size = 256;

template <class T>
array<T>::array(int size) :  curr_size(size) { ; }
|
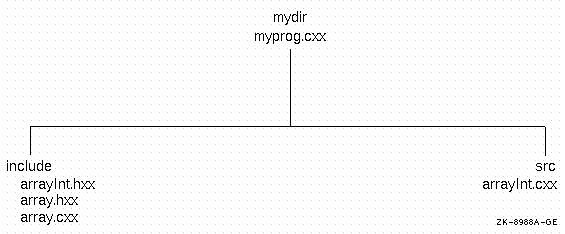
Then you would create a source file myprog.cxx that uses the array class as follows:
// myprog.cxx

#include <array.h>

main() {
        array<int> ai;

        // ...
}
|
Figure 3-1 shows the placement of these files.
Figure 3-1 Placement of Template Declaration and Definition
Files
You would then compile
myprog.cxx
with the following command:
cxx -I include myprog.cxx |
In this case, you do not need to create library source files because the static member data and out-of-line members of the array template class are instantiated at the time you compile myprog.cxx .
However you would need to create library source files for the following cases:
Table 3-1 describes where to place declarations and definitions, as discussed in Section 3.4.1 and Section 3.4.2.
| Feature | Declaration | Out-of-Line Definition |
|---|---|---|
| Class | Header file | |
| Static member data | Within class declaration | Library source file |
| Member function | Within class declaration | Library source file |
| Global function | Header file | Library source file |
| Global data | Header file | Library source file |
| Template class | Template declaration file | |
| Static member data of template class | Within template class declaration | Template definition file |
| Member function of template class | Within template class declaration | Template definition file |
| Global template function | Template declaration file | Template definition file |
| Global, nontemplate friend function of template class | Within template class declaration | Library source file |
| Specialization of template class | Template declaration file | |
| Specialization of template function | Template declaration file | Library source file |
Libraries are useful for organizing the sources within your application as well as for providing a set of routines for other applications to use. Libraries can be either object libraries or shareable libraries. Use an object library when you want the library code to be contained within an application's image; use shareable libraries when you want multiple applications to share the same library code.
Creating a library from nontemplate code is straightforward: you simply compile each library source file and place the resulting object file in your library.
Creating a library from template code requires that you explicitly request the instantiations that you want to provide in your library. See Chapter 6 for details on how to do this.
If you make your library available to other users, you must also supply the corresponding declarations and definitions that are needed at compile time. For nontemplate interfaces, you must supply the header files that declare your classes, functions, and global data. For template interfaces, you must provide your template declaration files as well as your template definition files.
For more information on creating libraries, see the ar(1) reference page and the loader(1) reference page.
3.5 Using 32-bit Pointers (xtaso)
Normally, Compaq C++ uses 64 bits for all pointers in generated code. The eXtended Truncated Address Support Option (xtaso), and other #pragma directives and compiler options, let code with 32-bit pointers coexist within this 64-bit operating system environment. Such a capability can be useful when the data layout used for pointers must be compatible with the layout on a 32-bit processor.
The 32-bit pointer data type lets application developers minimize the amount of memory used by dynamically allocated pointers. Using 32-bit pointers can sometimes improve performance if the volume of data occupied by pointers is large. In certain instances, the capability can be helpful in porting applications that contain assumptions about pointer sizes, although the following precautions apply:
To use 32-bit pointers, you must use a combination of #pragma preprocessor directives and command-line compiler options. These #pragmas are described in Section 2.2.1 and are summarized in the following table:
| pragma Directive | Description |
|---|---|
| pointer_size |
Controls the pointer size of all pointers except virtual function and
virtual base pointers in a C++ class object.
Has an effect only if you specify one or more of the pointer-size compiler options. |
| required_pointer_size | Has the same effect as #pragma pointer_size but is always enabled, whether or not you specify any pointer-size compiler options. |
| required_vptr_size |
Controls the size of virtual function and virtual base pointers in a
C++ class object.
Always enabled, whether or not you specify any pointer size compiler options. |
The pointer size compiler options are -xtaso , -xtaso_short , -vptr_size , and -vptr_size_short . Whenever any of these options are specified on the command line, the following actions occur:
Additionally, the pointer size options individually have following effects:
| Compiler Option | Description |
|---|---|
| -xtaso | Sets the default pointer size of the compilation unit to 64 bits (for all pointers except virtual function and virtual base pointers in a C++ class object). This is the normal default unless overridden by -xtaso_short . |
| -xtaso_short | Sets the default pointer size of the compilation unit to 32 bits (for all pointers except virtual function and virtual base pointers in a C++ class object). |
| -vptr_size | Makes 64 bits the default size of virtual function and virtual base pointers in a C++ class object. This is the normal default unless overridden by -vptr_size_short . |
| -vptr_size_short | Makes 32 bits the default size of virtual function and virtual base pointers in a C++ class object. |
Note that you cannot reset the size of the this pointer. The this pointer always remains the system default pointer size, which is 64 bits.
When using these #pragma directives and compiler options, you must take particular care if you call functions in any library compiled with different pointer sizes. The approaches that you can use to mix 32- and 64-bit pointers are as follows:
The second approach generally is more difficult because of problems in combining your code with code that expects 64-bit pointers. The sections that follow discuss these approaches in more detail.
Approach 1: Making 64 bits the default pointer size
With this approach, most pointers in your application are 64 bits, and 32 bits are used for selected pointers. To use this approach, you must compile with -xtaso to enable #pragma pointer_size and cause the cxx command to pass -taso to the linker. In addition, you use #pragma pointer_size , #pragma required_pointer_size , and #pragma required_vptr_size to control the pointer sizes for particular declarations. For example, to save space in an object, you can declare a class as follows:
#pragma pointer_size save
#pragma required_vptr_size save
#pragma pointer_size short
#pragma required_vptr_size long
        class Table_Node {
                char *table;    // 32-bit pointers
                Table_Node *next;
                Table_Node *(Table_Node::*search)(char *);
                                // pointer to member has
                                // 2 32-bit fields
        public:
#pragma pointer_size long
                void insert_node(char *);
                Table_Node *extract_node(char *);
                Table_Node *search_forward(char *);
                Table_Node *search_backward(char *);
        };
#pragma pointer_size restore
#pragma required_vptr_size restore
|
With this approach, you must take care to specify the pointer size #pragma directives after any #include directives, so that header files that assume 64-bit pointer sizes are not affected.
Approach 2: Making 32 bits the default pointer size
To use this approach, compile using the -xtaso_short and -vptr_size_short options on the cxx command. With this approach, the default pointer size is 32 bits; you must take care when interfacing to code that expects 64-bit pointers.
Specifically, you must protect header files so that the pointer size assumptions made in compiling the header file are the same as those made when the associated code was compiled. None of the system header files, including those for the standard C library, are protected. For more information, see Section 3.5.1.
Regardless of which approach you use, you must take particular care when passing any data that contains pointers (for example, an array of pointers or a struct that contains pointers) to be sure that the pointer size is the same as expected by the called function.
Compaq C++ does not permit overloading based on pointer sizes. To
minimize problems, you should declare functions, including member
functions with long pointer sizes. During calls to such functions,
Compaq C++ promotes short pointers to long pointers.
When compiling with the
-xtaso_short
option, you must protect header files so that pointer size assumptions
that are made when the header file is included into a compilation unit
using the
#include
directive are the same as those made when the code associated with the
header file was compiled.
None of the system header files are protected. Thus, most programs will
not work correctly when compiled with the
-xtaso_short
option, unless you protect the system header files and any other header
files associated with code that assumes 64-bit pointers.
To provide the necessary protection you can one of the following:
If you choose to modify each header file needing protection, you can
use the
#pragma environment
directive, as in the following example:
3.5.1 Protecting Header Files When Using -xtaso_short
#pragma __environment save // Save pointer size #pragma __environment header_defaults // set to system defaults // existing header file #pragma__environment restore // Restore pointer size |
See Section 2.2.1.2 for more information about using this pragma.
With this option, you can place special header files in a directory. Compaq C++ processes these special header files before and after each file included with the #include directive from this directory. These special header files are named:
__DECC_include_prologue.h
__DECC_include_epilogue.h
The compiler checks for files with these special names when processing #include directives. If the special prologue file exists in the same directory as a file with the #include directive, the contents of the prologue file are processed just before the file included with the #include directive. Similarly, if the epilogue file exists in the same directory as the file included with the #include directive, it is processed just after that file.
For convenience, you can protect header files using the script supplied in the following directory:
/usr/lib/cmplrs/cxx/protect_system_headers.sh |
This script creates, in all directories in a directory tree that contain header files, symbolic links to special header prologue and epilogue files.
The default directory tree root assumed by the script is
/usr/include
, but you can specify other roots.
3.6 Hints for Designing Upwardly Compatible C++ Classes
If you produce a library of C++ classes and expect to release future revisions of your library, you should consider the upward compatibility of your library. Having your library upwardly compatible makes upgrading to higher versions of your library easier for users. And if you design your library properly from the start, you can accomplish upward compatibility with minimal development costs.
The levels of compatibility discussed in this section are as follows:
The format in which your library ships determines the levels of compatibility that apply:
| If you ship your library in ... | The following apply: |
|---|---|
| Source format | Source compatibility only |
| Object format | Source and link compatibility |
| Shareable library format | All three kinds of compatibility |
If you break compatibility between releases, you should at least
document the incompatible changes and provide hints for upgrading
between releases.
3.6.1 Source Compatibility
Achieving source compatibility means that users of your library will not have to make any source code changes when they upgrade to your new library release. Their applications will compile cleanly against your updated header files and will have the same run-time behavior as with your previous release.
To maintain source compatibility, you must ensure that existing functions continue to have the same semantics from the user's standpoint. In general, you can make the following changes to your library and still maintain source compatibility:
Achieving link compatibility means that users of your library can relink an application against your new object or shareable library and not be required to recompile their sources.
To maintain link compatibility, the internal representation of class objects and interfaces must remain constant. In general, you can make the following changes to your library and still maintain link compatibility:
Because the user may be linking object modules from your previous release with object modules from your new release, the layout and size of class objects must be consistent between releases. Any user-visible interfaces must also be unchanged; even the seemingly innocent change of adding const to an existing function will change the mangled name and thus break link compatibility.
The following are changes that you cannot make in your library:
Designing Your C++ Classes for Link Compatibility
Although the changes you are allowed to make in your library are severely restricted when you aim for link compatibility, you can take steps to prepare for this and thereby reduce the restrictions. Compaq suggests using one of the following design approaches:
Achieving run compatibility means that users of your library can run an application against your new shareable library and not be required to recompile or relink the application.
This requires that you follow the guidelines for link compatibility as
well as any operating system guidelines for shareable libraries. For
example, you need to ensure your version identifier is upwardly
compatible between releases. Refer to the reference pages for
ld
for information on creating a shareable library.
3.6.4 Additional Reading
The C++ Programming Language, 2nd Edition offers some advice on compatibility issues; the information is sprinkled throughout the book, but a good summary can be found at the end of section 5.3.1. Another good reference is Designing and Coding Reusable C++, Chapter 7, by Martin D. Carroll and Margaret E. Ellis.
| Previous | Next | Contents | Index |
