| Oracle® Data Guard Concepts and Administration 10g Release 1 (10.1) Part Number B10823-01 |
|
|
View PDF |
| Oracle® Data Guard Concepts and Administration 10g Release 1 (10.1) Part Number B10823-01 |
|
|
View PDF |
An Oracle Data Guard configuration can consist of any combination of single-instance and RAC multiple-instance databases. This chapter summarizes the configuration requirements and considerations that apply when using Oracle Data Guard with Oracle Real Application Clusters databases. It contains the following sections:
You can configure a standby database to protect a primary database using Real Application Clusters. The following table describes the possible combinations of instances in the primary and standby databases:
| Instance Combinations | Single-Instance Standby Database | Multi-Instance Standby Database |
|---|---|---|
| Single-instance primary database |
Yes |
Yes |
| Multi-instance primary database |
Yes |
Yes |
In each scenario, each instance of the primary database transmits its own redo data to archived redo log files on the standby database.
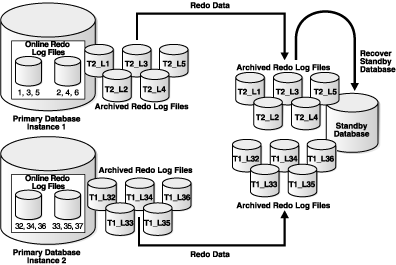
Figure B-1 illustrates a Real Application Clusters database with two primary database instances (a multi-instance primary database) transmitting redo data to a single-instance standby database.

Text description of the illustration sbr81088.gif
In this case, Instance 1 of the primary database archives redo data to local archived redo log files 1, 2, 3, 4, 5 and transmits the redo data to the standby database destination, while Instance 2 archives redo data to local archived redo log files 32, 33, 34, 35, 36 and transmits the redo data to the same standby database destination. The standby database automatically determines the correct order in which to apply the archived redo log files.
Follow the instructions in Chapter 3 (for physical standby database creation) or Chapter 4 (for logical standby database creation) to configure each primary instance.
Follow the instructions in Chapter 3 (for physical standby database creation) or Chapter 4 (for logical standby database creation) to define the STANDBY_ARCHIVE_DEST and LOG_ARCHIVE_FORMAT parameters to specify the location of the archived redo log files and standby redo log files.
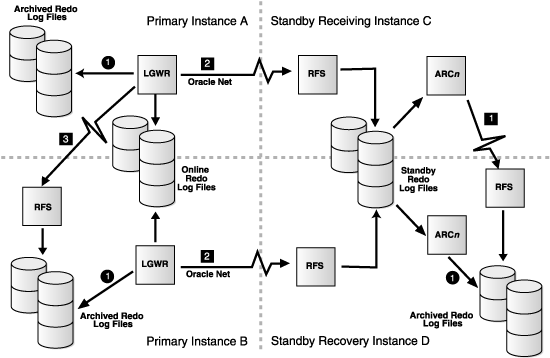
Figure B-2 shows a configuration where the primary and standby databases are in a Real Application Clusters environment. This enables you to separate the log transport services processing from the log apply services processing on the standby database, thereby improving overall primary and standby database performance.

Text description of the illustration rac_arch.gif
In Figure B-2, the numbers within circles indicate local connections, and the numbers within boxes indicate remote connections.
In a Real Application Clusters environment, any standby instance can receive redo data from the primary database; this is a receiving instance. However, the archived redo log files must ultimately reside on disk devices accessible by the recovery instance. Transferring the standby database archived redo log files from the receiving instance to the recovery instance is achieved using the cross-instance archival operation.
The standby database cross-instance archival operation requires use of standby redo log files as the temporary repository of primary database archived redo log files. Using standby redo log files not only improves standby database performance and reliability, but also allows the cross-instance archival operation to be performed on clusters that do not have a cluster file system. However, because standby redo log files are required for the cross-instance archival operation, the primary database can use either the log writer process (LGWR) or archiver processes (ARCn) to perform the archival operations on the primary database.
When both the primary and standby databases are in a Real Application Clusters configuration, then a single instance of the standby database applies all sets of log files transmitted by the primary instances. In this case, the standby instances that are not applying redo data cannot be in read-only mode while Redo Apply is in progress.
Perform the following steps to set up log transport services on the standby database:
LOCATION attribute of the LOG_ARCHIVE_DEST_1 initialization parameter to archive locally, because cross-instance archiving is not necessary.SERVICE attribute of the LOG_ARCHIVE_DEST_1 initialization parameter to archive to the recovery instance.Perform the following steps to set up log transport services on the primary database:
LGWR attribute on the LOG_ARCHIVE_DEST_n parameter to designate that the LGWR process will perform the archival operation.LOG_ARCHIVE_DEST_n parameter to an appropriate value.Ideally, each primary database instance should archive to a corresponding standby database instance. However, this is not required.
In a cross-instance archival environment, each instance directs its archived redo log files to a single instance of the cluster. This instance is called the recovery instance. This instance typically has a tape drive available for RMAN backup and restore support. Example B-1 shows how to set up the LOG_ARCHIVE_DEST_n initialization parameter for archiving redo data across instances. Execute these statements on all instances except the recovery instance.
SQL> ALTER SYSTEM SET LOG_ARCHIVE_DEST_1 = 'LOCATION=archivelog MANDATORY REOPEN=120';
SQL> ALTER SYSTEM SET LOG_ARCHIVE_DEST_STATE_1 = enable;
SQL> ALTER SYSTEM SET LOG_ARCHIVE_DEST_2 = 'SERVICE=prmy1 MANDATORY REOPEN=300';
SQL> ALTER SYSTEM SET LOG_ARCHIVE_DEST_STATE_2 = enable;
Destination 1 is the repository containing the local archived redo log files required for instance recovery. This is a mandatory destination. Because the expected cause of failure is lack of adequate disk space, the retry interval is 2 minutes. This should be adequate to allow the DBA to purge unnecessary archived redo log files. Notification of destination failure is accomplished by manually searching the primary database alert log.
Destination 2 is the recovery instance database where RMAN is used to back up the archived redo log files from local disk storage to tape. This is a mandatory destination, with a reconnection threshold of 5 minutes. This is the time needed to fix any network-related failures. Notification of destination failure is accomplished by manually searching the primary or standby database alert log.
Cross-instance archiving is available using the ARCn process only. Using the LGWR process for cross-instance archiving results in the RFS process failing, and the archive log destination being placed in the Error state.
This section contains the Data Guard configuration information that is specific to Real Application Clusters environments. It contains the following topics:
The format for archived redo log filenames is in the form of log_%parameter, where %parameter can include one or more of the parameters in Table B-1.
For example:
LOG_ARCHIVE_FORMAT = log%d_%t_%s_%r.arc
The thread parameters %t or %T are mandatory for Real Application Clusters to uniquely identify the archived redo log files with the LOG_ARCHIVE_FORMAT parameter. See Section 5.7.1 for more information about storage locations for archived redo log files.
You can specify the amount of physical storage on a disk device to be available for an archiving destination using the QUOTA_SIZE attribute of the LOG_ARCHIVE_DEST_n initialization parameter. An archive destination can be designated as being able to occupy all or some portion of the physical disk represented by the destination. For example, in a Real Application Clusters environment, a physical disk device can be shared by two or more separate nodes. As there is no cross-instance initialization parameter knowledge, none of the Real Application Clusters nodes is aware that the physical disk device is shared with other instances. This leads to substantial problems when the destination disk device becomes full; the error is not detected until every instance tries to archive to the already full device. This affects database availability.
In a Real Application Clusters configuration when running in either maximum protection or maximum availability mode, any instance that loses connectivity with a standby destination will cause all other instances to stop sending data to that destination (this maintains the data integrity of the data that has been transmitted to that destination and can be recovered).
When the failed standby destination comes back up, Data Guard runs the site in resynchronization mode until no gaps remain. Then, the standby destination can participate in the Data Guard configuration again.
The following list describes the behavior of the protection modes in Real Application Clusters environments:
If a lost destination is the last participating standby destination, the instance loses connectivity and will be shut down. Other destinations in a Real Application Clusters configuration that still have connectivity to the standby destinations will recover the lost instance and continue sending to their standby destinations. Only when every instance in a Real Application Clusters configuration loses connectivity to the last standby destination will the primary database be shut down.
This section contains the following topics:
For a Real Application Clusters database, only one primary instance and one standby instance can be active during a switchover. Therefore, before a switchover, shut down all but one primary instance and one standby instance. After the switchover completes, restart the primary and standby instances that were shut down during the switchover.
Before performing a failover to a Real Application Clusters standby database, first shut down all but one standby instance. After the failover completes, restart the instances that were shut down.
This section provides help troubleshooting problems with Real Application Clusters. It contains the following sections:
When your database is using Real Application Clusters, active instances prevent a switchover from being performed. When other instances are active, an attempt to switch over fails with the following error message:
SQL> ALTER DATABASE COMMIT TO SWITCHOVER TO STANDBY;
ALTER DATABASE COMMIT TO SWITCHOVER TO STANDBY *
ORA-01105: mount is incompatible with mounts by other instances
Action: Query the GV$INSTANCE view as follows to determine which instances are causing the problem:
SQL> SELECT INSTANCE_NAME, HOST_NAME FROM GV$INSTANCE
  2> WHERE INST_ID <> (SELECT INSTANCE_NUMBER FROM V$INSTANCE);
INSTANCE_NAME HOST_NAME
------------- ---------
INST2         standby2
In the previous example, the identified instance must be manually shut down before the switchover can proceed. You can connect to the identified instance from your instance and issue the SHUTDOWN statement remotely, for example:
SQL> CONNECT SYS/CHANGE_ON_INSTALL@standby2 AS SYSDBA
SQL> SHUTDOWN;
SQL> EXIT
If you configured Data Guard to support a primary database in a Real Application Clusters environment and the primary database is running in maximum protection mode, a network outage between the primary database and all of its standby databases will disable the primary database until the network connection is restored. The maximum protection mode dictates that if the last participating standby database becomes unavailable, processing halts on the primary database.
If you expect the network to be down for an extended period of time, consider changing the primary database to run in either the maximum availability or the maximum performance mode until network connectivity is restored. If you change the primary database to maximum availability mode, it is possible for there to be a lag between the primary and standby databases, but you gain the ability to use the primary database until the network problem is resolved.
If you choose to change the primary database to the maximum availability mode, it is important to use the following procedures to prevent damage to your data.
The following steps describe what to do if the network goes down and you want to change the protection mode for the Real Application Clusters configuration. The example assumes you are using a server parameter file (SPFILE), not a PFILE.
STARTUP MOUNT command to start one instance:
STARTUP MOUNT;
ALTER DATABASE SET STANDBY DATABASE TO MAXIMIZE AVAILABILITY;
Later, when the network comes back up, perform the following steps to revert to the maximum protection mode: