| Oracle® Database 2 Day + Java Developer's Guide 11g Release 1 Part Number B28765-01 |
|
|
View PDF |
| Oracle® Database 2 Day + Java Developer's Guide 11g Release 1 Part Number B28765-01 |
|
|
View PDF |
This chapter describes how to create a master-detail application using Oracle Application Developer Framework (Oracle ADF) in the following sections:
A master-detail application allows you to view data from related tables at the same time. The records from a master table can be viewed along with related records from the detail table. If provisioning to edit the master-detail data is built into the application, you can also edit data from both the tables from a common interface. The master-detail application created in this chapter consists of:
An ADF middle-tier set of Java/XML objects to allow data in the table from the HR schema to be accessed and updated. This is in one project called model.
A user interface (UI), or view, that consists of a set of JSPs that serve as the UI for the application. This will be in a project called view.
The model and view projects are based on the Java EE Model-View-Controller (MVC) design pattern, that is easily implemented using Oracle ADF.
Figure 7-1 shows the relationships among the items developed for this application.
Figure 7-1 Master Detail Application Pages
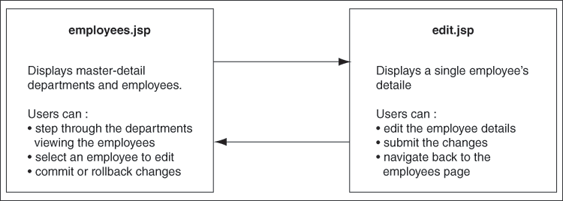
This application accesses the HR schema on Oracle Database. It uses the departments table as the master table to display detail data from the employees table. This chapter describes how you can use Oracle ADF with JDeveloper to create this application.
Oracle ADF is an end-to-end application framework that builds on Java EE standards and open-source technologies to simplify and accelerate creating service-oriented applications. You can use Oracle ADF to develop enterprise solutions that search, display, create, modify, and validate data using web, wireless, desktop, or web services interfaces. Used in tandem, Oracle JDeveloper 10g and Oracle ADF give you an environment that covers the full development lifecycle from design to deployment, with drag-and-drop data binding, visual UI design, and team development features built-in.
The following subsections introduce some of the Oracle ADF features that you will use to create the master detail application:
See Also:
http://www.oracle.com/technology/products/jdev/collateral/papers/1013/adf_10.1.3_overview.pdf for more information on Oracle ADF architecturehttp://www.oracle.com/technology/products/jdev/tips/muench/requiredreading/index.html for a compilation of resources on Oracle ADF
Oracle ADF Business Components is Java EE-compliant technology for developing business services for database-centric, enterprise Java EE applications. Oracle ADF Business Components simplifies building business services for developers familiar with 4GL tools like Oracle Forms.
Oracle ADF Business Components technology:
Automatically handles object-relational mappings and persistence for instances of its own library classes
Allows you to make complex requests for data retrieval using SQL
Automatically handles transaction management
Provides a framework for implementing complex business logic
Automatically implements many Java EE design patterns
Has a powerful caching and data passivation system for increasing the performance and scalability of applications
All of this functionality is fully customizable. To create the ADF middle-tier for the application created in the book, you create ADF Business Components from database tables.
Oracle ADF Faces is based on the JavaServer Faces (JSF) JSR 127 specification. Oracle ADF Faces components are used in the user interfaces of the application. These components can be used in any IDE that supports JSF.
You can use Oracle ADF Faces to determine a consistent look and feel for your application. This allows you to focus on user interface interaction rather than look and feel compliance. ADF Faces components also support multi–language and translation implementation as well as accessibility features.
JDeveloper provides several design tools, wizards, special dialogs, and property editors that help you insert and use ADF Faces components in your pages. For example, the Visual Editor lets you design user interfaces by dragging and dropping components from the Component Palette. If you are familiar with XML or JSP/HTML coding, you can also edit the source of the page files to insert ADF Faces component tags.
Facets are similar to named children components. You use facets inside parent components to control how some child components should be displayed on a page. Facets are placeholders for certain types of UI components.
The ADF Faces af:panelPage component, which is used in the sample application, lets you lay out an entire page. It supports facets for laying out page-level and application-level text, images, actions, and buttons in specific areas of the page.
When you drop an ADF Faces component onto a page, the JSP/HTML Visual Editor displays any facets as dotted line rectangular boxes.
Oracle ADF data controls permit the application client to access business services defined by the model object layer. Business services can be any collection, value, or action that your model project defines. At runtime, the databound UI components can access the business services defined by the business services.
If you use Oracle ADF Business Components as your business service technology, your data model components will be exposed in the model layer as Oracle ADF data controls. In the sample application, it is not necessary to create data controls for the Oracle ADF Business Components you create, because they already implement the data control interfaces for you.
Before you proceed to developing the master detail application, you must create a Connection object that establishes a connection between the application and the database. For instructions to create a Connection object, refer to Chapter 3.
From the File menu, select New to display the New Gallery. From the General category, select Application.
In the Create Application dialog box, enter AnyCo_ADF_MD as the Name of the application, leave the Application Package Prefix blank, and for the Application Template, select No template - All technologies. Then click OK.
In the Create Project dialog, enter model as the Project Name and click OK.
You now have an application called AnyCo_ADF_MD, which contains a project called model.
In the model project, you will create the ADF Business Components to allow the hr.Departments and hr.Employees tables to be displayed and edited by the application.
In the JDeveloper Application Navigator, select the model project.
From the File menu, select New to display the New Gallery. Expand the Business Tier category, and select ADF Business Components. In the Items list, select Business Components from Tables.
In the Initialize Business Components Project screen, make sure the hr connection is selected, and click OK.
On the Create Business Components from Tables – Welcome screen, click Next.
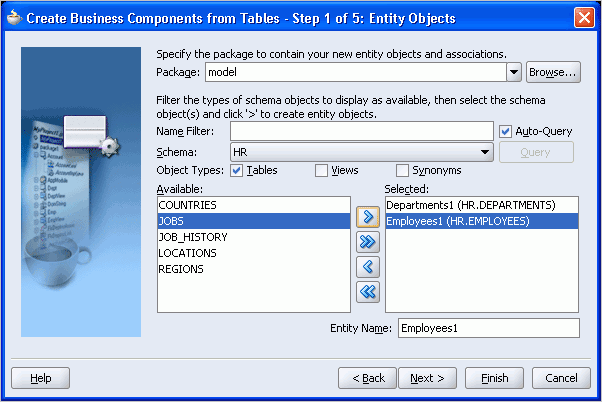
On the Entity Objects screen, to see a list of the tables available, select the Auto-Query checkbox. From the Available list of tables, move the DEPARTMENTS and EMPLOYEES tables over to the Selected list as shown in Figure 7-2. Click Next.
Figure 7-2 Selecting Schema Objects to Create Entity Objects
On the Updatable View Objects screen, move Departments (HR.DEPARTMENTS) and Employees (HR.EMPLOYEES) to the Selected list. Click Next.
On the Read-Only View Objects screen, click Next.
On the Application Module screen, you can name your ADF Application Module. Enter AnyCoAppModule as the Name. Click Next.
On the Diagram, you can request a business components diagram. However, this is not essential for this application, so click Next.
On the Finish dialog box, check the details and if they are correct, click Finish. The business components you defined are created in the model project.
Save all your work.
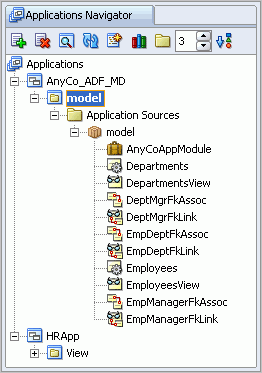
You have now generated an ADF middle-tier, for which you can build a user interface. At this point, you additional business component objects that handle the foreign key relationships from the database are also generated. These include: DeptMgrFkAssoc, DeptMgrFkLink, and so on.
Figure 7-3 shows the Application Navigator, where you can expand the contents of the model project, and see the items that are created for your application.
Figure 7-3 Navigating Through an ADF Model
The application user interface consists of a set of JSP pages. For this application, the user interface (UI), referred to as the view, is defined in a separate project.
To create the application UI, you define a project called view as follows:
In the Application Navigator, select the AnyCo_ADF_MD application and from the File menu, select New to display the New Gallery. From the General category, select Empty Project.
In the Create Project dialog box, enter view as the Name of the new project, and click OK.
Using the following instructions, you create a page called employees.jsp, which will be used to allow users to browse through a coordinated set of master-detail pages of departments and employees.
In the Application Navigator, select the view project. Right-click the project and select New to display the New Gallery.
In the New Gallery, expand the Web Tier category and select JSF. In the Item list, select JSF JSP and click OK.
On the Create JSF JSP – Welcome screen, click Next.
On the Web Application screen, accept the default and click Next.
On the JSP File screen, enter employees.jsp as the File Name, and ensure that JSP Page (*.jsp) is selected for the page type. Click Next.
On the Component Binding screen, ensure that Do Not Automatically Expose UI Components in a Managed Bean is selected. Click Next.
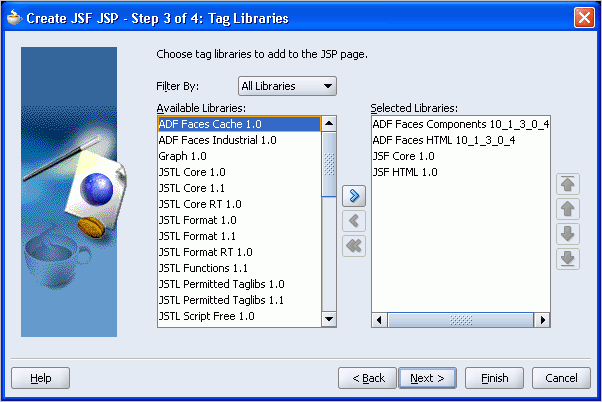
On the Tag Libraries screen, if they are not already included, add ADF Faces Components and ADF Faces HTML to Selected Libraries on the right-hand side. The JSF Core and JSF HTML tag libraries should also be listed as Selected Libraries on the right-hand side. This is shown in Figure 7-4.
Figure 7-4 Selecting Libraries for the JSF JSP
Click Finish.
The new empty employees.jsp is now displayed in the JSP/HTML Visual Editor, ready for you to start designing the page.
In these steps, you add items to the page to define the page layout. As in earlier chapters, you use the Component Palette to drop tags onto your page. For this page, you use the ADF Faces PanelPage component.
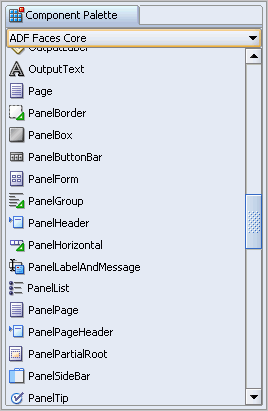
If the Component Palette is not displayed, use the View menu to display it. Select the ADF Faces Core tab of components. Drag and drop the PanelPage component on the blank page. The ADF Faces Core page of the Component Palette is shown in Figure 7-5.
Figure 7-5 ADF Faces Core Component Palette
After dropping it, you should see a dark blue line with the text Title 1, as shown in Figure 7-6.
On the page, click on the PanelPage component and in the Property Inspector, change the value of Title field from Title 1 to Browse Employees, then press Enter. The title change is now reflected in the page in the Visual Editor.
In this step, you add another ADF Faces component onto the page to serve as the page title, by dragging a component into the branding section of the PanelPage. From ADF Faces Core page of the Component Palette, drag an OutputText component and drop it into the branding facet, that is, the dotted line square box with title branding in the upper left corner of the page.
The new OutputText is now displayed with a default value of outputText1. Change this to read AnyCo Corporation by changing the value of OutputText in the Property Inspector.
Now change the look and feel of the text by changing the StyleClass property of the OutputText to have the value AFHeaderLevelOne. This is a style which is defined by ADF Faces.
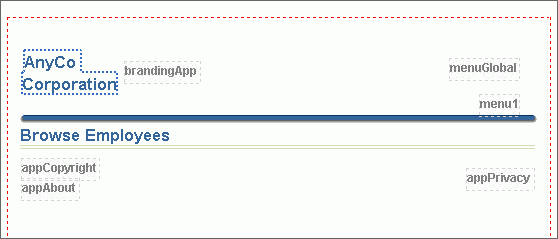
Once changed, the text should appear larger and blue in the Visual Editor. Figure 7-7 shows the page in the Visual Editor after these steps.
Figure 7-7 PanelPage Component with Added Text
In these steps you will add items to the page to allow users to browse departments and their employees. In these steps you use the Data Control Palette, which by default is on the right of the JDeveloper display, alongside the Component Palette. The Data Control Palette allows you to drop data objects called ADF Data Controls onto your pages.
The first stage is to add a read-only form which will display the departments along with navigation buttons to step through the different departments and their related employees. To do this, you drag onto the page one of the data controls you created in the model project.
Select the Data Control Palette, and expand the AnyCoAppModule node. Figure 7-8 shows the Data Control Palette with the AnyCoAppModule expanded.
In the Data Control Palette, select the DepartmentsView1 node and drag it onto the middle of the page just beneath the Browse Employees text.
As the drop occurs, a popup menu is displayed. Select Create, Forms, then ADF read-only form.
In the Edit Form Fields dialog, select Include Navigation Controls and click OK. This is shown in Figure 7-9.
The Visual Editor now displays the read-only form with navigation buttons on the page. If the form does not appear, click the refresh button. The values of the form fields are provided by using expression language such as #{...}. This is how JSF identifies application data that is to be rendered on the page.
Figure 7-10 shows what the page looks like in the Visual Editor after these steps.
In these steps, you will first add a horizontal separator to the page, to separate the department data from the detail employee data. Then, to display the detail employee data for each master department, you use another of the data controls created from the Business Components you created in the model project. You choose the data control that links employee data to a particular master department. You display the employee data below the ObjectSeparator.
To add a separator to the page, from the ADF Faces Core page of the Component Palette drag an ObjectSeparator component and place it underneath the form in the Visual Editor. A dotted horizontal line is displayed beneath the form.
In the Data Control Palette, expand the DepartmentsView1 node.
In addition to the fields of the departments table, there is also a child EmployeesView3 node. This node represents the detailed or set of employees restricted by its foreign key to the departments table.
Drag and drop the EmployeesView3 node onto the page beneath the dotted horizontal line (ObjectSeparator).
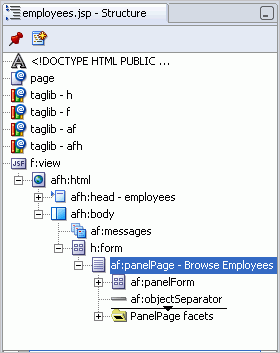
As you hover the mouse before dropping, the Visual Editor and the Structure window on the lower left indicate where the drop will occur. Adjust the drop position in the Structure window so that it is after the af:objectSeparator as shown in Figure 7-11.
Figure 7-11 Structure Window Showing Dropped Position
As the drop is finished, a shortcut menu is displayed. Select Create, then Table, and ADF Read-only Table.
In the Edit Table Columns dialog, select Enable selection and Enable sorting.
Before clicking OK, delete the three columns: DepartmentId, ManagerId, and CommissionPct. For each of these rows in turn, select the row, then click Delete.
The Edit Table Columns dialog box is shown in Figure 7-12.
Then click OK to generate the table.
Save your work.
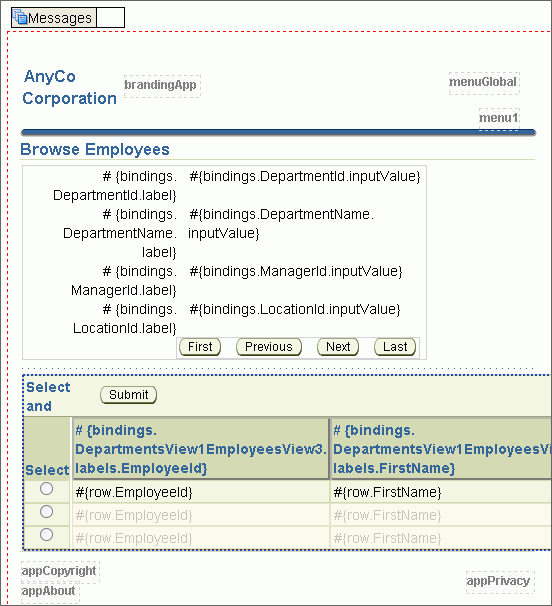
You should now see both the master form and detail table in the Visual Editor as in Figure 7-13.
Figure 7-13 Master-Detail View in Visual Editor
After adding the departments and employees to the page is a good stage to test the application so far. To test the application:
In the Application Navigator, right-click the page employees.jsp and select Run. This will start up the application locally by using the embedded OC4J server in JDeveloper. When the application has started, the master-detail employees page is displayed in a browser.
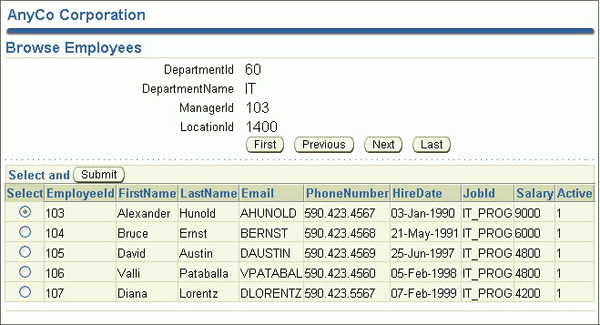
To test the master-detail coordination, click on the navigation buttons in the departments form (Next, Previous, First, Last). Notice as you click on the navigation buttons, that the related employees are displayed in the table below.
The page when viewed in a browser is similar to that shown in Figure 7-14.
Figure 7-14 Employee Data Viewed in a Browser
To conclude the test, shutdown the server. To do this, in JDeveloper, right-click in the log window titled Running: Embedded OC4J Server – Log, and select Terminate.
You can use a JSF navigation diagram to plan out your application. The diagram shows the application pages and the navigation cases between them.
You can create new pages directly from the diagram and then define the navigation between them, using elements dropped from the Component Palette.
You can then edit your JSF pages with tools such as the Visual Editor, and can edit the navigation cases directly from the diagram.
To allow users to edit employee data, you will create a new page, edit.jsp. Onto this page you will drop an ADF input form from Data Control Palette.
In these steps, instead of creating a new page directly using the JSF JSP wizard, you will create it from the JSF navigation diagram. In later steps, you will also define the navigation between the pages visually on the diagram.
To open the JSF navigation diagram for the application, in the Application Navigator, right-click the view project and select Open JSF Navigation.
A blank navigation diagram is displayed.
To start defining the navigation rules, drag the existing employees.jsp page from the Application Navigator onto the blank diagram.
A page icon is displayed on the navigation diagram representing the employees.jsp page.
To create a new page, with the JSF navigation diagram still displayed in the editing window, from the JSF Navigation Diagram page of the Component Palette, drag JSF Page onto the diagram.
As the new page icon appears on the diagram, enter the text edit.jsp to replace the name /untitled1.jsp and press Enter. (You do not need to add the forward slash in front of the name, because it will be added automatically.)
At this point, a new page has been added to the diagram, but the page file itself does not exist. To indicate that, the page icon renders with a yellow caution sign.
To create the edit.jsp page, double-click the page icon for the page edit.jsp in the diagram.
In the Create JSF JSP wizard, if the Welcome page is displayed, click Next. The name of the page is already entered for you, and the remaining steps should be exactly as for the employees.jsp page created earlier, so you can click Finish.
The new page is displayed in the Visual Editor, ready for you to design the page.
Navigation by a user through a JSF application is defined using navigation rules that determine which page is displayed next when the user clicks a link. The different cases, such as the different links on the page, are defined as navigation cases.
You can use a diagram to draw the navigation between the pages of the application representing the flow between the pages.
When you draw navigation on a JSF navigation diagram, two things happen: the navigation cases are added to the necessary configuration files automatically for you, and the navigation cases are shown on the diagram as arrows connecting pages, the direction of the arrow indicating the pages from which and to which the user will navigate.
A label is associated with each navigation case, to distinguish different navigation cases from a single page.
In these steps, to allow for navigation between the two pages of the application, you will add navigation details to the application.
Return to the JSF navigation diagram to define the navigation between the two pages. To do this, among the items open in the editing window, select the tab for faces-config.xml. If the diagram is not still open, open it as before.
In the diagram, click on the employees.jsp page icon to establish focus on this page.
On the JSF Navigation Diagram page of the Component Palette, click (not drag) JSF Navigation Case.
On the diagram, click the employee.jsp icon again. After you have clicked on the page, as you start to move the mouse away from the page, a line appears, connected to the employees.jsp page. Connect this line to the new page by clicking on the edit.jsp page.
A line now connects the two pages, representing a navigation case navigating from the employees.jsp page to the edit.jsp page. It has a label with a default value of success.
To change the value, click success, type edit, and press the Enter key. The text edit is now displayed on the diagram as the label for the line.
Add another navigation case navigating from the edit.jsp page to the employees.jsp page, and give the navigation case the name return. This navigation case represents navigating from the edit.jsp page back to the employees.jsp page.
Save your work.
The navigation diagram now shows both navigation cases: one for a user to navigate from the employees.jsp page to the edit.jsp page so they can edit employee details, and another for the user to return to the employees.jsp. Figure 7-15 shows the navigation diagram for the employees.jsp and edit.jsp pages.
To create an edit page in which users can edit employee data, you will use an ADF Faces component to lay out the page, in exactly the same way as for the employees page.
For the employee data, a data control is used. To display the correct employee data for a particular employee in a particular department, there is a data control available giving employee data as a child data control of the department data control you used on the employees page. This data control gives the correct set of employee data.
So that users can edit the data, you display it in an ADF Form, rather than a table.
In these steps, you create the edit.jsp page:
Open the edit.jsp page in the Visual Editor.
On the edit.jsp page, from the ADF Faces Core page of the Component Palette, add a PanelPage component to the page. Change the title of the PanelPage to Edit Employee.
Also, add an OutputText component to the branding facet at the top of the page. Set the Value property to AnyCo Corporation and the StyleClass property to AFHeaderLevelOne.
In the Data Control Palette, expand the DepartmentsView1 node (if it is closed) and locate the same EmployeesView3 node beneath it. This must be the child of DepartmentsView1, as illustrated below.
Drag the EmployeesView3 node onto the center of the panel beneath the Edit Employee title. In the dialog box that is displayed, select Create, Forms, and ADF Form.
Note:
It is important to select the childEmployeesView3 node under parent DepartmentsView1 from the Data Control Palette. The child EmployeesView3 will show the detail Employee records for a particular parent Deparment as designated by the foreign key relationship.In the Edit Form Fields dialog, select Include Submit Button and click OK.
The edit form is almost complete. The final task is to add a button that will allow the user to navigate back to the employees.jsp page. To do this:
From the ADF Faces Core page of the Component Palette, drag a CommandButton to the page and place it next to the Submit button at the bottom of the page.
Use the Property Inspector to change the Text property of the button from commandButton 1 to Return.
Again using the Property Inspector, change the Action property of the CommandButton to Return. You can use the arrow in the Action field to select the value return. This is the value you entered for the navigation case for a user navigating from the edit.jsp page back to the employees.jsp page.
Save the page.
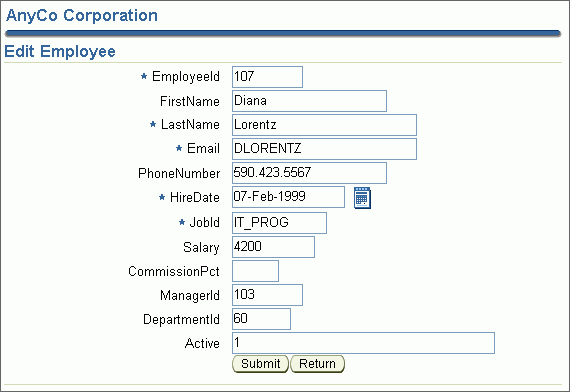
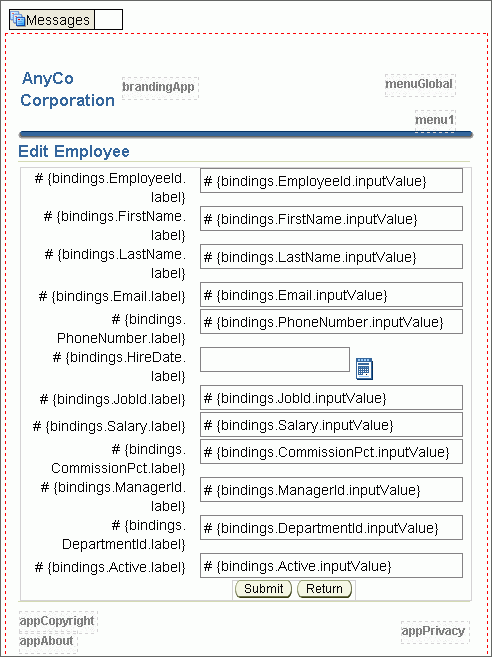
The edit page is now complete, and should resemble the page shown in Figure 7-16.
Figure 7-16 Editing the Employees detail form in the Visual Editor
One remaining task is to allow users viewing the employees page to navigate to the edit page to edit employee details. To do this, you make use of the navigation case you defined on the navigation diagram, which had the name edit. The Employees table on the employees page already has a button, which can be used for the user to navigate to the edit page.
Open the employees.jsp page in the Visual Editor.
Select the Submit button to establish focus.
In the Property Inspector, change the Text property to Edit. Set the Action property to edit: use the arrow in the Action field to select the value edit. This is the value you specified on the navigation diagram as the navigation case for a user to navigate from the employees.jsp page to the edit.jsp page.
Now when a user clicks on this button, the application will navigate to the edit page with the selected record displayed.
To enable commit and rollback functionality, so a user can commit the edits they have made to employee details, or abandon them by rolling back, you will add a Commit button and a Rollback button to the base of the employees.jsp page.
This step again uses facets. In this case, a footer facet is added to the table, and the Commit and Rollback buttons are added inside of this footer facet.
In these steps, to add the footer facet, you use the Structure window.
With employees.jsp displayed in the Visual Editor, in the Structure window, expand the table component (af:table). Within the structure, there is a Table Facets folder.
Expand the Table Facets folder. It contains several subfolders for different facets supported by the ADF Faces table component.
The footer facet is grey, because it is currently empty, as illustrated in Figure 7-17.
You will insert a footer facet into this placeholder, ready to hold the Commit and Rollback buttons.
In the Structure window, right-click the footer facet node and select Facets -Table, and then Footer.
The footer facet is added to the page at the base of the table as shown in Figure 7-18.
You are now able to place JSF components into the footer facet.
The Commit and Rollback buttons you need are available in the Data Control Palette in the Operations node which is an immediate child of the parent AnyCoAppModuleDataControl.
To add the buttons to your page:
In the Data Control Palette, expand the AnyCoAppModuleDataControl folder, then the Operations folder. The Operations folder contains the Commit and Rollback nodes.
Drag each of the Commit and Rollback nodes onto the footer facet at the base of the table.
As you drop each of the operations from the Data Control Palette onto the footer facet, a dialog box is displayed. Select Create ADF Command Button.
Save all your work.
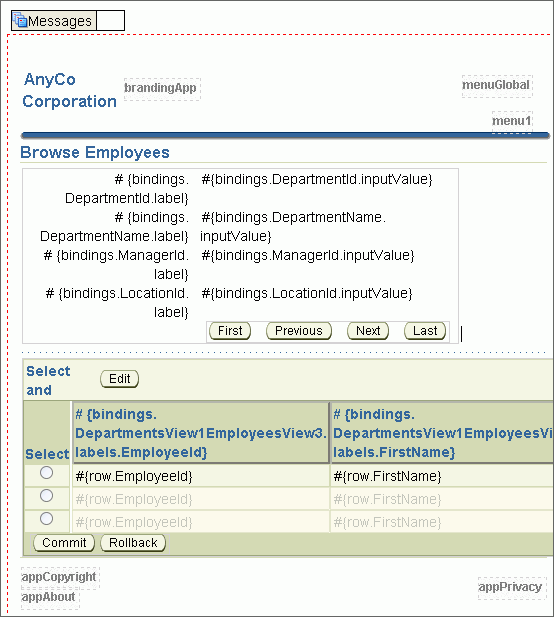
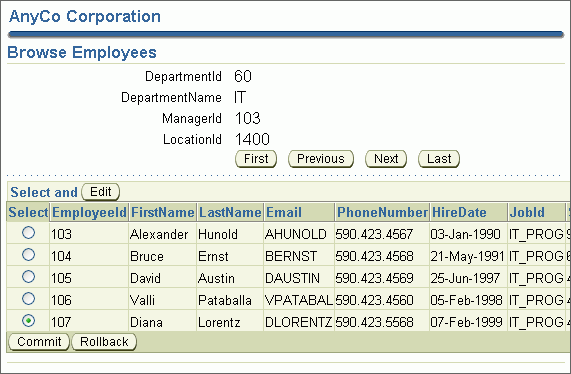
The application is now complete. The final employees.jsp page is as shown in Figure 7-19.
Figure 7-19 Finished Master-Detail Application in Visual Editor
You may now run the application as follows:
In the Application Navigator, right-click employees.jsp and select Run from the shortcut menu.
As you run the application, you will be able to navigate through the different Departments and then select individual Employees for editing. Experiment with updating either the salary or hiredate of an employee.
The Employees page displayed in a browser is shown in Figure 7-20.
Figure 7-20 Master-Detail Application Viewed in a Browser
The edit page displayed in a browser is similar to that shown in Figure 7-21.
Figure 7-21 Editing the Master Detail Application Content
